The Cancellation Policy feature introduces a new workflow for Rescheduled, Canceled, and No Show appointments allowing you to configure and enforce your organization’s cancellation policies to collect revenue for canceled and no-show appointments. These policies can be enforced within the system or when appointments are canceled by Clients via the Client Portal, SMS reminder(s) or Phone reminder(s).
NOTE: See FAQs: Schedule Optimization for more information on this feature.
Jump to Section:
Cancellation Service Type Setup
The Cancellation Policy feature allows you to either manually apply a fee to appointments as needed or apply a predetermined fee to all Late Cancel or No Show appointments utilizing Non-CPT Service Types. With the introduction of this feature, three new Non-CPT Service Types have been added:
- Cancel Fee
- Late Cancel Fee
- No Show Fee
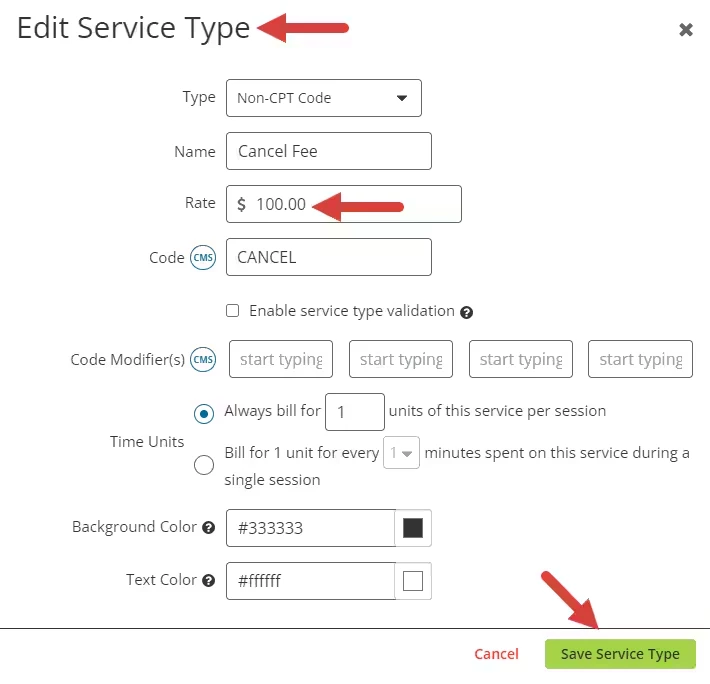
You can set a fee for each service type, which will populate automatically when the appointment status is changed. If you prefer to apply the rate manually as needed, you don’t need to set a fee for each service type and can skip this step. To set a predetermined fee for each of these Service Types:
- Click Organization and Settings in the primary navigation bar.
- Click the Service Types tab.
- Click each new Service Type (Cancel Fee, Late Cancel Fee, and No Show Fee). The Edit Service Type window opens.

- Enter a Rate for each service type and click Save Service Type.
NOTE: This step is optional if you would prefer to manually apply a fee to appointments as needed.
Cancellation Policy Setup
The Cancellation Policy feature can apply the fees configured in the previous step to all Late Cancel and No Show appointments without user intervention.
NOTE: This step is optional if you would prefer to decide which appointments should have the fees applied.
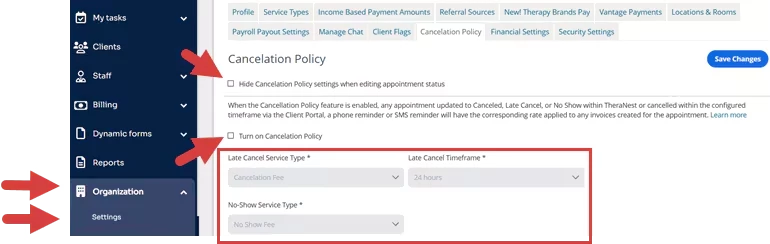
To enable the Cancellation Policy to apply the predetermined fees to all Late Cancel and No Show appointments:
- Click Organization and Settings in the primary navigation bar.
- Click the Policies tab.
- Optional: Enable the Hide Cancellation Policy Settings When Editing Appointment Status setting.
- Enable the Turn on Cancellation Policy setting.
- Select a Late Cancel Service Type: The system generated Late Cancellation Fee Service Type will be automatically selected, however any Non-CPT Service Type can be utilized.
- Select a Late Cancel Timeframe (12, 24, 48, or 72 hours): This setting will determine the timeframe in which a Late Cancel fee will be applied to appointments canceled by Clients via the Client Portal, SMS reminder(s), or Phone reminder(s).
Example: If the timeframe is set to 24 hours and a Client cancels an appointment via the Client portal that has a start time 12 hours in the future, the Late Cancel Fee will be applied. -
Select a No Show Service Type: The system generated No Show Fee Service Type will be automatically selected, however any Non-CPT Service Type can be utilized.
-
Click Save Changes.
IMPORTANT: After the Cancellation Policy is configured and enabled, all appointments updated to Late Cancel, or No Show status within the system or canceled via the Client Portal, SMS reminder, or Phone reminder within the configured timeframe will have the corresponding rate applied to any Invoice(s) created for the appointment.
NOTE: Cancel Fee does not automatically populate unless the service type is applied manually to the invoice or appointment.
Manually apply Cancel, Late Cancel, or No Show Fee to an Appointment
If your Organization does not want to utilize the Cancellation Policy feature, Late Cancel, and No Show fees can be manually applied to appointments:
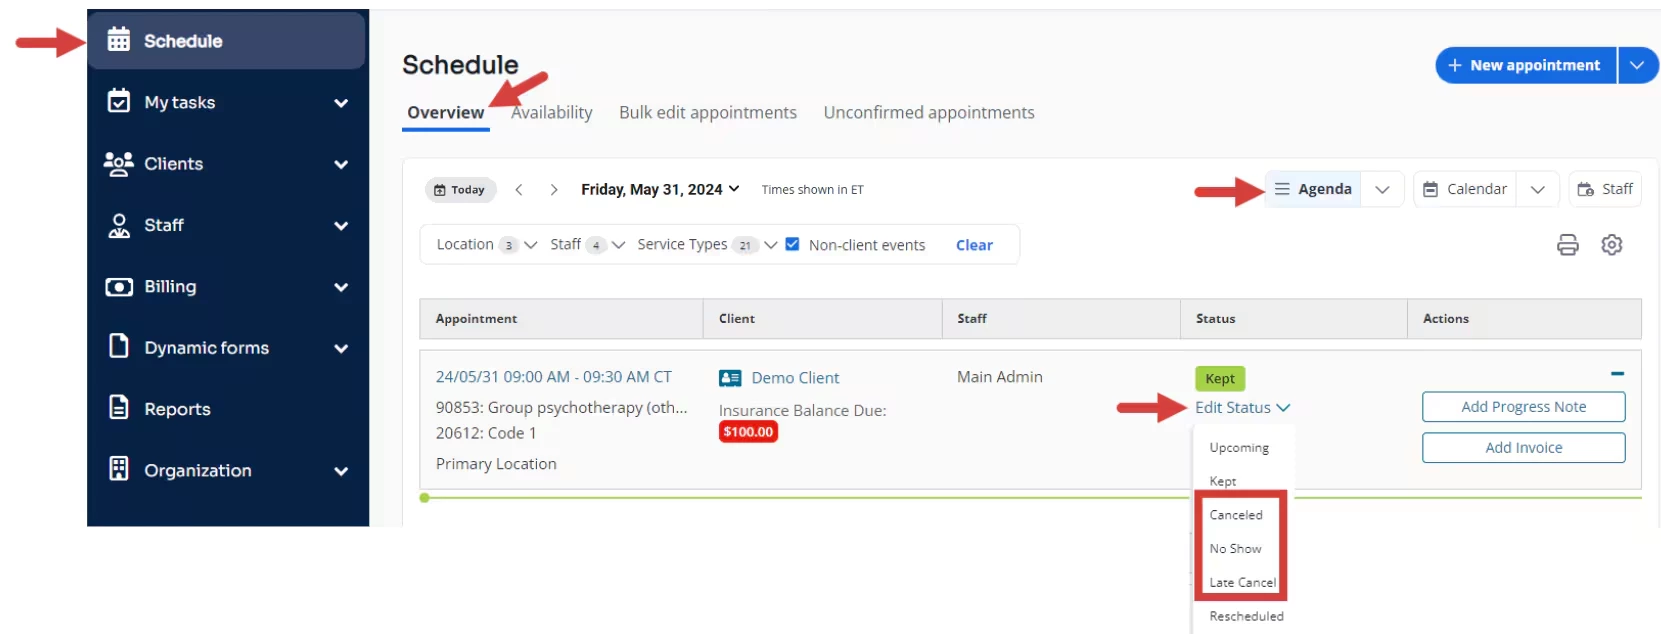
- Click Schedule in the primary navigation bar.
- Click the Overview tab.
- Click the Agenda view.
- Click Edit Status for the appointment that needs a status manually applied.
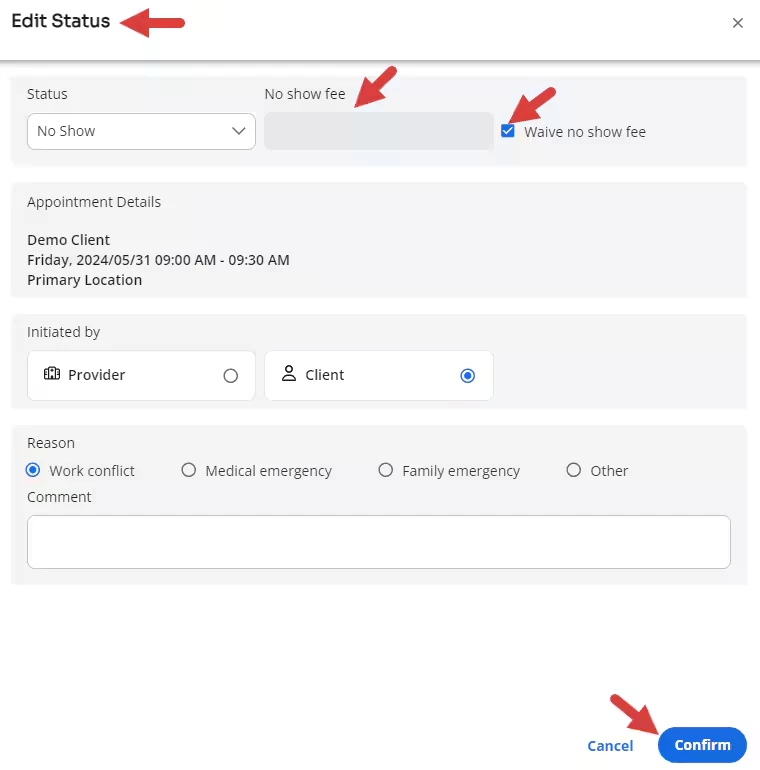
- Select Canceled, Late Cancel or No Show from the dropdown menu. The Edit Status window opens and defaults to the status selected.

- Confirm the status selected.
- If you have previously configured rates for the Late Cancel Fee, or No Show Fee Service Types, the rate associated with the status selected populate in the Fee field or you can manually add a numerical fee by unchecking the Waive Fee option.
- Click Confirm.
Remove Cancel, Late Cancel or No Show Fee from an Appointment
If a Cancel, Late Cancel, or No Show fee has been previously applied to an appointment and needs to be removed prior to creating an Invoice for the appointment:
- Click Schedule in the primary navigation bar.
- Click the Overview tab.
- Click the Agenda view.
- Click Edit Status for the appointment that needs to have its fee removed.
- Select Canceled, Late Cancel, or No Show from the drop-down menu. The Edit Status modal opens and defaults to the status selected with the fee present in the Fee field.
- Click Waive Fee. The fee field becomes inactive.
- Click Confirm.
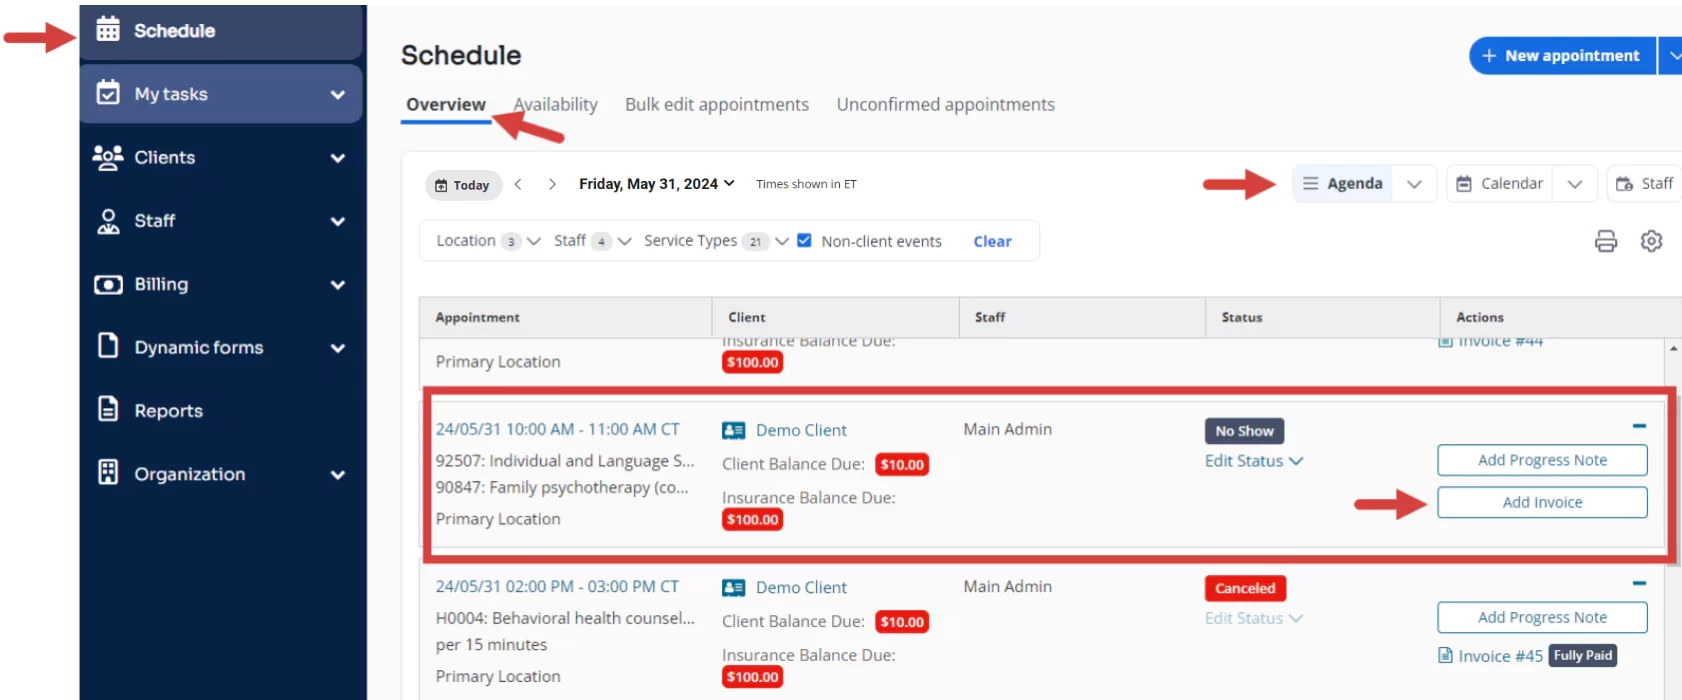
Create Invoice for an Appointment with a Cancel, Late Cancel, or No Show Fee
Once a Cancel, Late Cancel, or No Show fee has been applied to an appointment, an invoice can be created for the client:
NOTE: Cancel Fee does not automatically populate unless the service type is applied manually to the invoice or appointment.
- Click Schedule in the primary navigation bar.
- Click the Overview tab.
- Click the Agenda view.
- Locate the appointment that needs to have an invoice created.
- Click Add Invoice.
NOTE: An Invoice will be created with the Cancel, Late Cancel, or No Show fee applied to the appointment and the original Service Type rate will be set to $0.00.