

If your Therapist uses the Self-Schedule option, you will be able to self-schedule Appointments via the Client Portal or through a direct link provided by your Therapist.
Once you schedule your Appointment, your Therapist will receive a notification and will confirm or decline the request. You will be able to see the status of your Appointment Requests in your Client Portal.
IMPORTANT: Some Therapists might not choose to use the Self-Schedule option. If you do not see that +Add Appointment button and you think you are supposed to, check with your Therapist to ensure that they are using this feature.
Jump to Section:
Create Appointment Request from Appointments Tab
- If your Therapist gave you a link to create an Appointment, click that link and skip to step 4.
- If not, login to your Client Portal and click Appointments in the top navigation.
- Click New Appointment button.
- The appointment pop-up window opens. Select the following:
- Provider - who you would like to schedule an appointment with
- Location - the location of the appointment
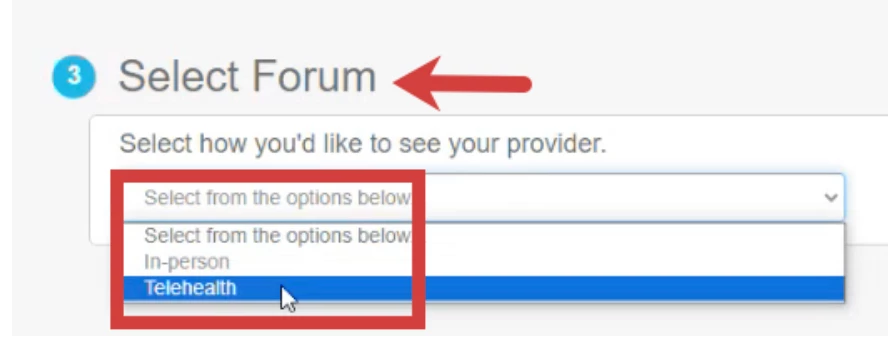
- Forum - select in-person or telehealth if this setting is enabled
NOTE: Depending on how your provider has availability set up, you may see a Select Forum field when requesting an appointment. You will need to specify whether you want to request a Telehealth or In-person appointment.
- Service - based on the selected provider, select the service for the appointment
- Availability - see available times based on the selected provider's schedule.
Double-click and drag in any available space on the calendar to select the date & time for the appointment.NOTE: Unavailable times are greyed out on the calendar.
- Click Save.
- Click Submit New Appointment.
- Click View My Appointments to see the new appointment.
- You will receive an email notification that the Appointment is waiting for your Therapists confirmation.
NOTE: Click the Manage Appointment button to make changes to your Appointment Request.
Create Appointment Request from the Calendar Tab
- Log in to your Client Portal and click Calendar in the top navigation.
- Click New Appointment button or click directly on the calendar for the date & time you want to schedule.
- The appointment pop-up window opens. Select the following:
- Provider - who you would like to schedule an appointment with
- Location - the location of the appointment
- Service - based on the selected provider, select the service for the appointment.
- Availability - see available times based on the selected provider's schedule.
Double-click or drag in any available space on the calendar to select the date & time for the appointment.NOTE: Unavailable times are greyed out on the calendar.
- Click Save.
NOTE: The system validates the appointment information. An error message will display if there are conflicts related to the service type and availability of staff.
- Click Submit New Appointment.
- Click View My Appointments to see the new appointment.
Scheduling Telehealth Appointments with Your Therapist
- Your therapist has the option to allow you to schedule telehealth appointments through the client portal.
- If this feature is available to you, click +New Appointment.
- Select Provider and Location.
- Select Forum: Telehealth or In-person.
- Select Service(s).
NOTE: Only service types saved in the availability block will be available in the services list.
- Select the date and time for the appointment based on the provider's availability.
NOTE: Unavailable times are grayed out on the calendar.
- Click Submit New Appointment.
Check Appointment Status
After you have scheduled an Appointment you will be able to check the status (Unconfirmed or Confirmed).
From the Appointments Page
- Click the Appointments tab.
- Locate Upcoming Appointment and see Status.
From the Calendar Page
- Click the Calendar tab.
- Locate Upcoming Appointment on the calendar and see Status.