PERMISSION REQUIRED: You must be a business owner or someone with significant management responsibility in the business to complete the enrollment process.
The system offers integrated payment processing through Ensora Payments using Stripe, a secure payment processing platform. You can enroll in both Ensora Payments and Stripe from within the system. If you have all the required information and documents ready, it usually takes less than 20 minutes to complete your application for enrollment. After everything has been submitted, it can take up to two business days to process and approve your application.
We recommend that you make sure you have the items and information listed in the Prepare for Enrollment section BEFORE you begin your enrollment application. Once you have gathered everything you need, you can use this article to guide you through the application process.
NOTE: For payment-related questions, please contact the payments team at 1-877-288-5583 (select option 2, then option 6), or payments.support@ensorahealth.com.
Make sure to have the required documents and necessary business information ready before you start the enrollment process. You will also need a Mobile Phone to receive a text with a verification code in order to create your Stripe account. Once you have collected the items listed below, you are ready to begin your application!
IMPORTANT: Please be prepared to complete the application for Stripe enrollment in one sitting. This will help prevent application submission issues.
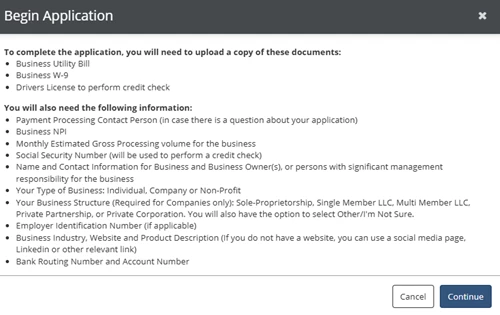
You will need digital copies of the following documents:
Business Utility Bill
Business W-9
Drivers License
You will need to provide the following information:
Payment Processing Contact Person (in case there is a question about your application)
Business NPI
Estimated Gross Processing amount for the business
Social Security Number
Name and Contact Information for Business and Business Owner(s), or persons with significant management responsibility for the business
Your Type of Business: Individual, Company or Non-Profit
Your Business Structure (Required for Companies only): Sole-Proprietorship, Single Member LLC, Multi Member LLC, Private Partnership, or Private Corporation. You will also have the option to select Other/I'm Not Sure.
Employer Identification Number (if applicable)
Business Industry, Website and Product Description (If you do not have a website, you can use a social media page, Linkedin or other relevant link)
Bank Routing Number and Account Number
Customer Support Contact Information (if applicable)
NOTE: You may have Multiple Stripe Accounts associated with the same email address. If you enroll in Ensora Payments with Stripe using the same credentials (email address and password) you used for an existing Stripe account, you can switch between these accounts in your Stripe dashboard.
Enrollment Part 1: Register for Ensora Payments
You can complete your Ensora Payments enrollment application from the Settings Module > Setup tab > Sign up for Stripe button within the system. If you started the enrollment process without finishing it, you can return to this screen and click the Sign up for Stripe button to complete your application.
IMPORTANT: You must disable pop-up blockers before you start this process.
NOTE: Remember, you must be a business owner or someone with significant management responsibility in the business to complete the enrollment process.
Navigate to the Organization section, select Settings, and click the Ensora Payments tab.
Click the Start Application button.
Click Continue on the Begin Application screen.
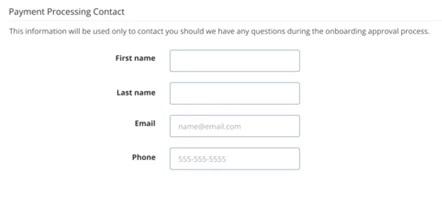
Enter Payment Processing Contact information for Ensora Payments. This information will only be used to reach out to you if there are any questions during the approval process.
First Name
Last Name
Email
Phone
Enter Business Information. You can drag and drop or click inside the blue upload box to upload files.
NOTE: File size limit is 10 MB per uploaded document.
NPI
Gross Estimated Processing
Copy of Utility Bill
Copy of W-9
Enter Personal Information.
NOTE: File size limit is 10 MB per uploaded document.
Social Security Number (SSN)
Copy of Drivers License
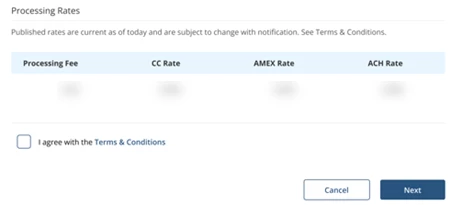
Click the I agree with the Terms & Conditions checkbox.
Click Next.
Click Continue.
Enrollment Part 2: Set up Stripe Account
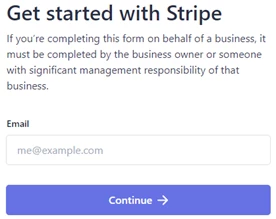
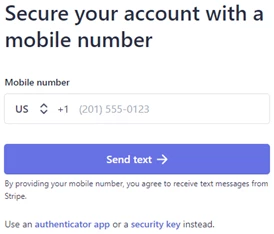
The Stripe enrollment process launches automatically after you complete the Ensora Payments enrollment screen. You will need to have a mobile phone handy in order to receive a text with a verification code. Remember, you must be a business owner or someone with significant management responsibility in the business to complete the enrollment process.
NOTE: You may have Multiple Stripe Accounts associated with the same email address. If you enroll in Ensora Payments with Stripe using the same credentials (email address and password) you used for an existing Stripe account, you can switch between these accounts in your Stripe dashboard.
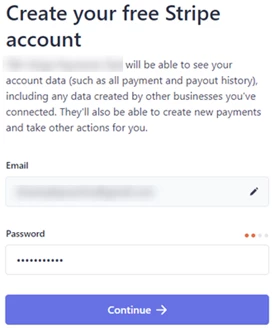
Enter your Email.
Click Continue.
Create a new Password for your Stripe account.
Click Continue.
Enter your Mobile Number.
Click Send Text.
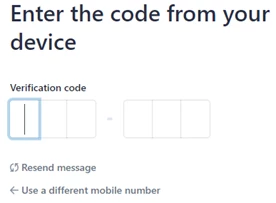
Enter the six-digit Verification Code from the text that was sent to your phone.
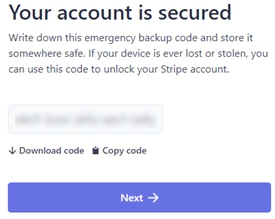
Write down the Emergency Backup Code.
Click Next.
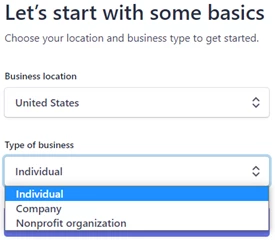
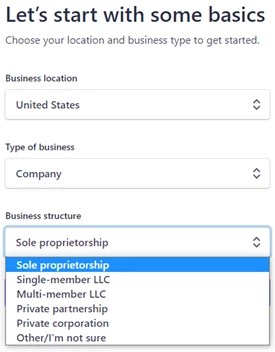
Enter Type of Business: Select Individual, Company, or Nonprofit Organization.
If you Select Individual or Nonprofit Organization, you can move on to Step 12.
If you selected Company, you will also be asked to select a Business Structure: Select Sole Proprietorship, Single-Member LLC, Multi-Member LLC, Private Partnership, Private Corporation, or Other/I'm Not Sure.
If you did not select Company, you will not be asked to select a Business Structure.
Enrollment Part 3: Enter Business Information in Stripe
Stripe will ask for specific business and personal information based on what type of business and business structure you selected on the previous screen. Click the link below that matches your business type and structure for a detailed, screen-by-screen guide.
TIP: Choose your business type below for specific instructions.
Type of Business: Individual
If you selected Type of Business: Individual, you will enter the information requested on the following screens to complete your application.
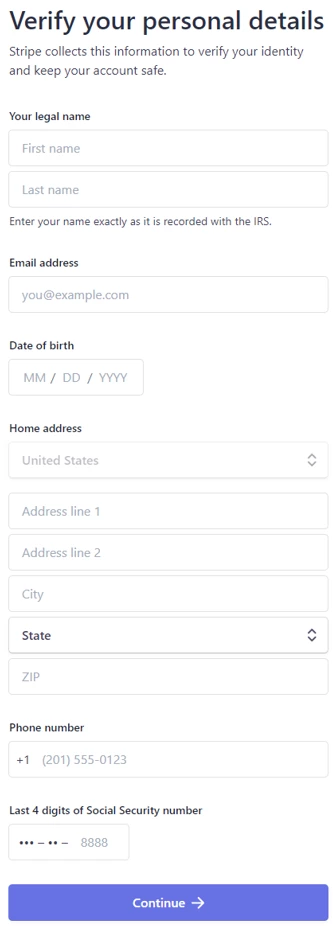
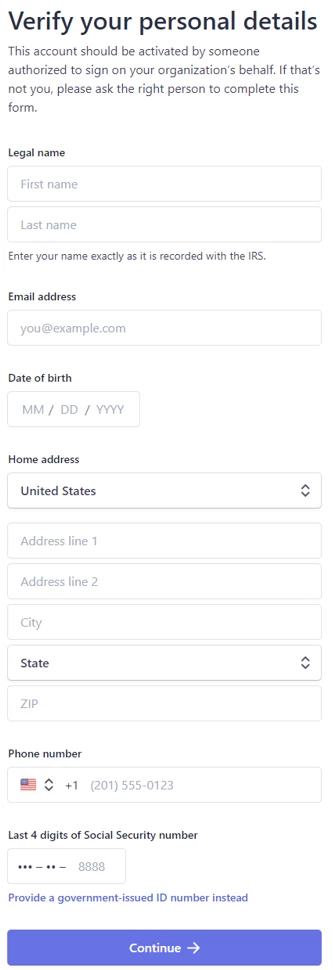
Enter your Personal Details:
Legal Name: Enter your name exactly as it is recorded with the IRS
Email Address
Date of Birth
Home Address
Phone Number
Last 4 Digits of Social Security Number: The last 4 digits of your Social Security number are only used to verify your identity - no credit checks.
Click Continue.
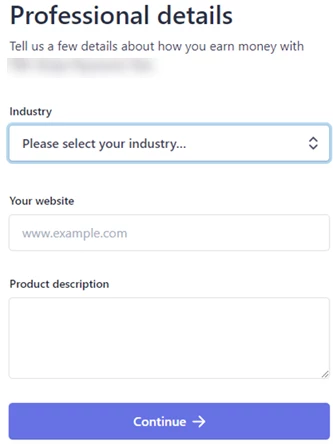
Enter Professional Details:
Industry: Select the option that most accurately reflects your industry from the dropdown list. NOTE: The Merchant Category Code (MCC code) is assigned per the industry selected on the Stripe application portion. Most of our customers' industry choices align with "Medical Services". This industry selection covers HSA an FSA card payments.
Website: If you don't have a website, enter a social media page, Linkedin or other relevant link.
Product Description: Provide a 1-2 sentence description. Make sure to note when you typically charge your customers (i.e. during checkout or 3 days later).
Click Continue.
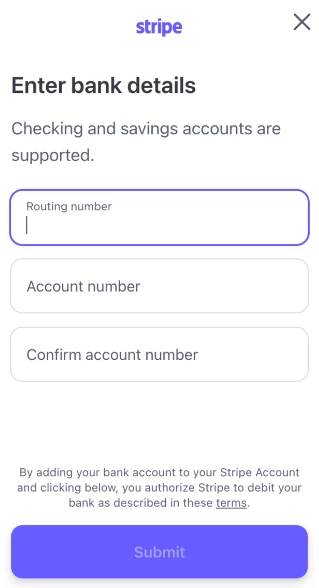
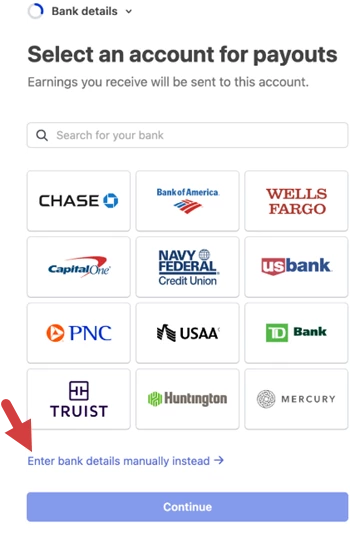
Click Enter bank details manually instead.
NOTE: The Ensora Payments team recommends that you manually enter your Routing and Account Numbers instead of selecting your bank. If you select the bank, you will be prompted to enter your banking login information (username and password).
Enter Banking Information, then click Submit:
Routing Number
Account Number
Confirm Account Number
This will be the bank account where stripe will transfer funds. It must be a checking account.
Enter Public Details for Customers:
Statement Descriptor: Enter your business name. This will display on your customers' bank or credit card statements. It should be 5 - 22 characters.
Shortened Descriptor: Enter a shortened version of your business name.
Customer Support Phone Number
Customer Support Address
Click Continue.
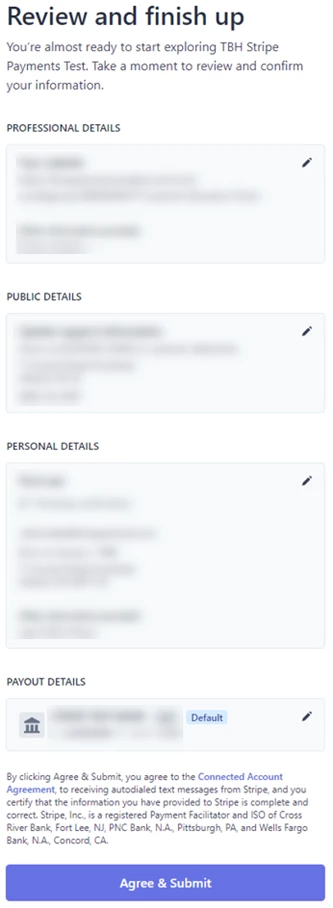
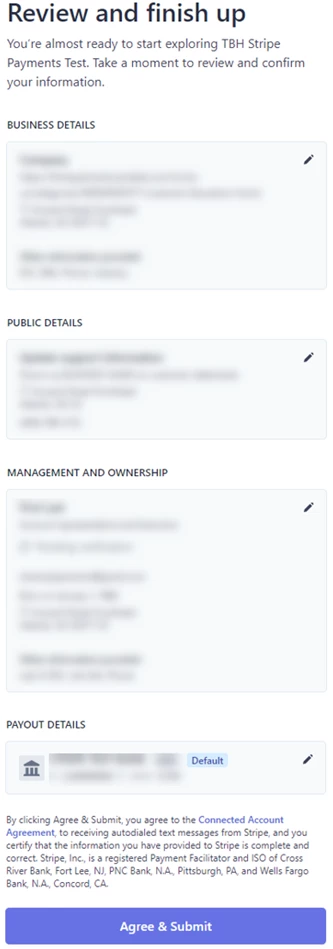
Review the information you entered on the previous screens:
Professional Details
Public Details
Personal Details
Payout Details
If you need to edit any of the information, click the pencil icon in the top right corner of the section.
Click Agree & Submit.
Your application is complete! You can close the Stripe window.
You can return to the Ensora Payments tab in the system to check the status of your application.
Type of Business: Nonprofit Organization
If you selected Type of Business: Nonprofit Organization, you will enter the information requested on the following screens to complete your application:
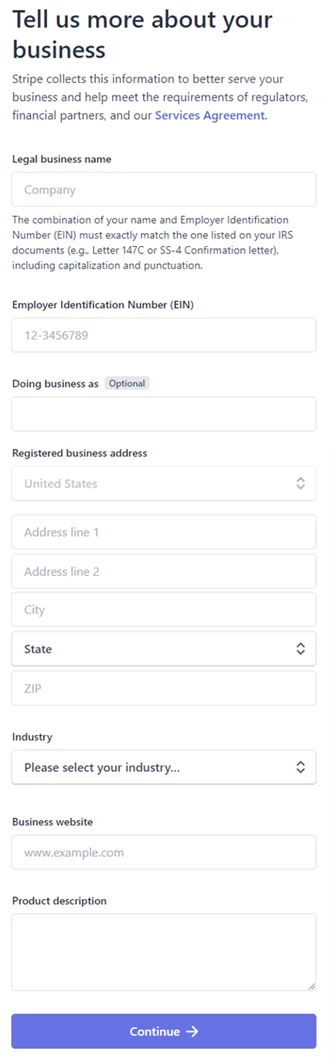
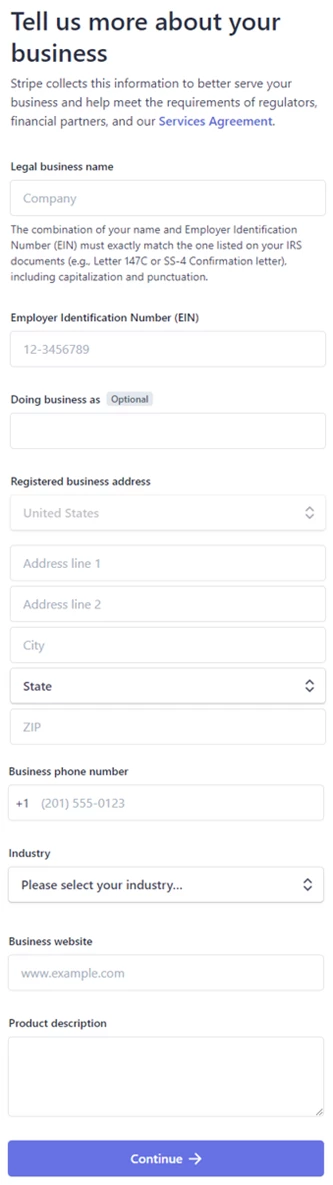
Enter Business Information:
Legal Business Name: The combination of your name and Employer Identification Number (EIN) must exactly match the one listed in your IRS documents (e.g., Letter 147C or SS-4 Confirmation letter), including capitalization and punctuation.
Employer Identification Number (EIN): If you use your social security number for business tax purposes, you can enter that instead.
Doing Business As: The operating name of your company, if it's different than the legal name. (Optional)
Registered Business Address: You can use your home address if you don't have a business address.
Business Phone Number
Industry
NOTE: The Merchant Category Code (MCC code) is assigned per the industry selected on the Stripe application portion. Most of our customers' industry choices align with "Medical Services". This industry selection covers HSA an FSA card payments.
Business Website: If you don't have a website, enter a social media page, LinkedIn or other relevant link,
Product Description: Provide a 1-2 sentence description. Make sure to note when you typically charge your customers (i.e. during checkout or 3 days later).
Click Continue.
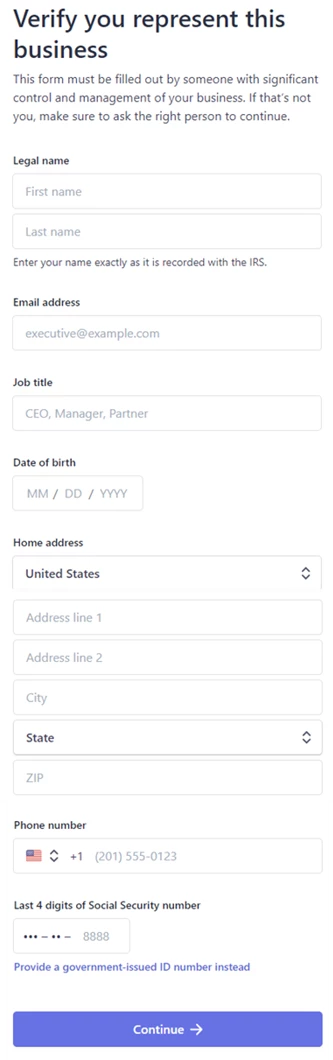
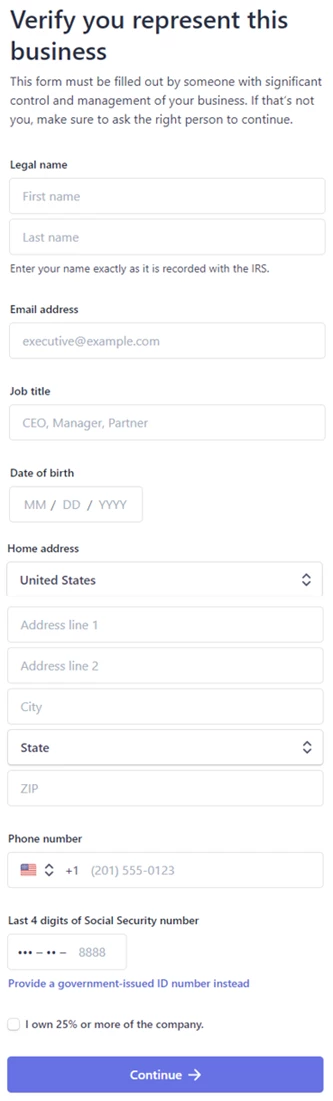
Enter Business Representative information:
Legal Name: Enter your name exactly as it is recorded with the IRS.
Email Address
Job Title
Date of Birth
Home Address
Phone Number
Last 4 Digits of Social Security Number: This is used to verify your identity - no credit checks.
Click Continue.
Click Enter bank details manually instead.
NOTE: The Ensora Payments team recommends that you manually enter your Routing and Account Numbers instead of selecting your bank. If you select the bank, you will be prompted to enter your banking login information (username and password).
Enter Banking Information, then click Submit:
Routing Number
Account Number
Confirm Account Number
This will be the bank account where stripe will transfer funds. It must be a checking account.
Enter Public Details for Customers:
Statement Descriptor: Enter your business name. This will display on your customers' bank or credit card statements. It should be 5 - 22 characters.
Shortened Descriptor: Enter a shortened version of your business name.
Customer Support Phone Number
Customer Support Address
Click Continue.
Review the information on the previous screens:
Business Details
Public Details
Management and Ownership
Payout Details
If you need to edit any of the information, click the pencil icon in the top right corner of the section.
Click Agree & Submit.
Your application is complete! You can close the Stripe window.
You can return to the Ensora Payments tab in the system to check the status of your application.
Type of Business: Company - Sole Proprietorship or Single-Member LLC
If you selected Type of Business: Company - Sole Proprietorship or Single-Member LLC, you will enter the information requested on the following screens to complete your application:
Enter Business Details:
Legal Business Name: The combination of your name and Employer Identification Number (EIN) must exactly match the one listed in your IRS documents (e.g., Letter 147C or SS-4 Confirmation letter), including capitalization and punctuation.
Employer Identification Number (EIN): If you use your social security number for business tax purposes, you can enter that instead.
Doing Business As: The operating name of your company, if it's different than the legal name. (Optional)
Registered Business Address: You can use your home address if you don't have a business address.
Industry
NOTE: The Merchant Category Code (MCC code) is assigned per the industry selected on the Stripe application portion. Most of our customers' industry choices align with "Medical Services". This industry selection covers HSA an FSA card payments.
Business Website: If you don't have a website, enter a social media page, Linkedin or other relevant link,
Product Description: Provide a 1-2 sentence description. Make sure to note when you typically charge your customers (i.e. during checkout or 3 days later).
Click Continue.
Enter Personal Details:
Legal Name: Enter your name exactly as it is recorded with the IRS
Email Address
Date of Birth
Home Address
Phone Number
Last 4 Digits of Social Security Number: The last 4 digits of your Social Security number are only used to verify your identity - no credit checks.
Click Continue.
Click Enter bank details manually instead.
NOTE: The Ensora Payments team recommends that you manually enter your Routing and Account Numbers instead of selecting your bank. If you select the bank, you will be prompted to enter your banking login information (username and password).
Enter Banking Information, then click Submit:
Routing Number
Account Number
Confirm Account Number
This will be the bank account where stripe will transfer funds. It must be a checking account.
Enter Public Details:
Statement Descriptor: Enter your business name. This will display on your customers' bank or credit card statements. It should be 5 - 22 characters.
Shortened Descriptor: Enter a shortened version of your business name.
Customer Support Phone Number
Customer Support Address
Click Continue.
Review the information on the previous screens:
Business Details
Public Details
Management and Ownership
Payout Details
If you need to edit any of the information, click the pencil icon in the top right corner of the section.
Click Agree & Submit.
Your application is complete! You can close the Stripe window.
You can return to the Ensora Payments tab in the system to check the status of your application.
Type of Business: Company - Multi-Member LLC, Private Partnership, Private Corporation, or Other/I'm not sure
If you selected Type of Business: Company - Multi-Member LLC, Private Partnership, Private Corporation, or Other/I'm not sure, you will enter the information requested on the following screens to complete your application:
Enter Business Information:
Legal Business Name: The combination of your name and Employer Identification Number (EIN) must exactly match the one listed in your IRS documents (e.g., Letter 147C or SS-4 Confirmation letter), including capitalization and punctuation.
Employer Identification Number (EIN): If you use your social security number for business tax purposes, you can enter that instead.
Doing Business As: The operating name of your company, if it's different than the legal name. (Optional)
Registered Business Address: You can use your home address if you don't have a business address.
Business Phone Number
Industry
NOTE: The Merchant Category Code (MCC code) is assigned per the industry selected on the Stripe application portion. Most of our customers' industry choices align with "Medical Services". This industry selection covers HSA an FSA card payments.
Business Website: If you don't have a website, enter a social media page, LinkedIn or other relevant link,
Product Description: Provide a 1-2 sentence description. Make sure to note when you typically charge your customers (i.e. during checkout or 3 days later).
Click Continue.
Enter Business Representative Information:
Legal Name: Enter your name exactly as it is recorded with the IRS.
Email Address
Job Title
Date of Birth
Home Address
Phone Number
Last 4 Digits of Social Security Number: This is used to verify your identity - no credit checks.
If applicable: Select the I Own 25% or More of the Company checkbox.
If you select this checkbox, Stripe will ask you to indicate if you are the only person who owns 25% or more of the company.
Click Continue.
If you indicated that you are the only person who owns 25% or more of the company, you can scroll down to step 10, where you will enter banking information.
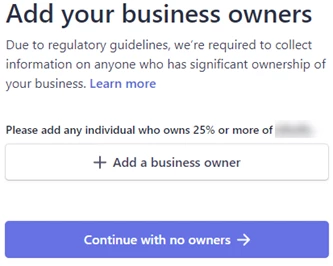
Click Add a Business Owner to add the name of any individual who owns 25% or more of the company, or click Continue With No Owners.
If you select Add a Business Owner, you will have the option to add someone new or select the business representative you entered on the previous screen.
If you select Continue with No Owners, you can scroll down to step 10 where you will enter banking information.
If you indicated on the previous screen that you are the only person who owns 25% or more of the company, you will not be asked to add business owners. You can scroll down to step 10 where you will add banking information.
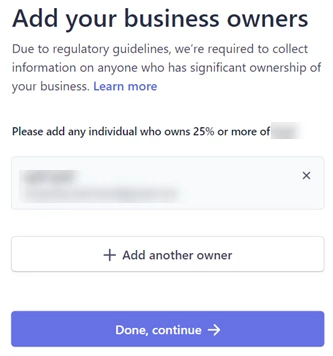
Enter Information for the Business Owner:
Legal Name: Enter the name exactly as it is recorded with the IRS.
Email Address
Click Add.
Click Add Another Owner to add additional business owners.
Click Done, Continue when you are finished adding business owners.
Click Enter bank details manually instead.
NOTE: The Ensora Payments team recommends that you manually enter your Routing and Account Numbers instead of selecting the option to link your bank account. If you select the option to link your bank account, you will be prompted to enter your banking login information (username and password).
Enter Banking Information, then click Submit:
Routing Number
Account Number
Confirm Account Number
This will be the bank account where stripe will transfer funds. It must be a checking account.
Enter Public Details for Customers:
Statement Descriptor: Enter your business name. This will display on your customers' bank or credit card statements. It should be 5 - 22 characters.
Shortened Descriptor: Enter a shortened version of your business name.
Customer Support Phone Number
Customer Support Address
Click Continue.
Review the information on the previous screens:
Business Details
Public Details
Management and Ownership
Payout Details
If you need to edit any of the information, click the pencil icon in the top right corner of the section.
Click Agree & Submit.
Your application is complete! You can close the Stripe window.
You can return to the Ensora Payments tab in the system to check the status of your application.
Enrollment Part 4: Approval
Once you have completed your stripe enrollment, your application for payment processing will be pending approval, which can take up to two business days. After your application is approved, your payment processing account will be Active.