REQUIRED PERMISSIONS: Organization Administrator
You can make changes to your plan at any time. As a Trial User, you will update your subscription plan when you are ready to subscribe to the system. You will also need to update your plan if you need edit the number of therapists and licenses on your plan, or if you decide to switch to a different subscription plan.
IMPORTANT: These instructions are for clinics that began a trial or purchased a subscription after May 22, 2025. These instructions also apply to clinics with expired trials or cancelled subscriptions that renewed after August 1, 2025. For other clinics, the steps to manage subscription plans and add-on features are different. For more information on these changes and how to find the right instructions for your clinic, please visit: How to Manage Your Subscription Plan.
Jump to Section:
Trial Customer Information
The system offers three plan options. As a trial customer, you are subscribed to the highest plan level by default. This gives you access to set up and use every feature offered in the system. During your trial, you can add as many users as you want. When you add a new user, licenses will automatically be available to assign to that user.
When you have finished your trial and are ready to begin your Subscription, go to the Organization tab and select Manage Subscriptions. You can also click the yellow Subscribe button on any page in the platform.
NOTE: Ensora eRx, Ensora Payments and Ensora Clearinghouse require separate enrollment processes and are not available in trial subscriptions.
Select a Plan - New Subscribers
The system offers three plan options. Different plan levels include access to different features and add-ons. Choose the plan that is best for your clinic's needs, then select the number of therapists who will need access.
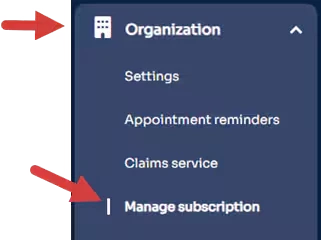
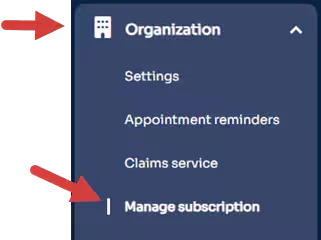
- Click Organization tab in primary navigation bar.
- Click Manage Subscription in side navigation.
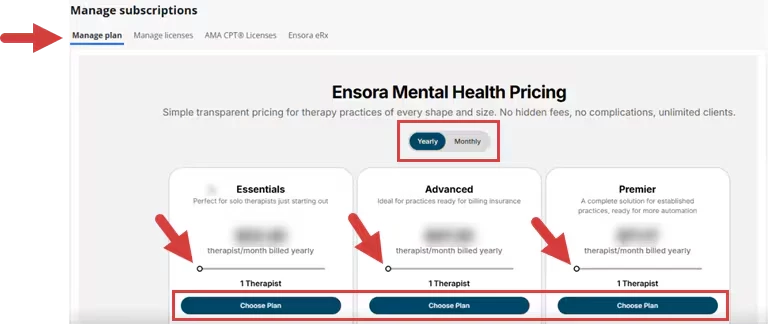
- The Manage Plan tab opens.
- Click the Yearly/Monthly toggle to select to be billed monthly or annually.
- Click and drag the Circle on the slide bar to increase or decrease the number of Therapists that are subscribing to the plan. (This will be the number of Provider Licenses in your plan.)
- Click the Choose Plan button to subscribe.
- The Your Cart screen opens. From here, you can:
- Review plan information and order summary.
- Make changes to the number of Therapists subscribing to the plan.
- Select Addons to include in your plan, for example, additional Admin licenses.
- Click the Proceed to Checkout button.
- Enter Billing Address and Payment Details.
- Click the Pay & Subscribe button.
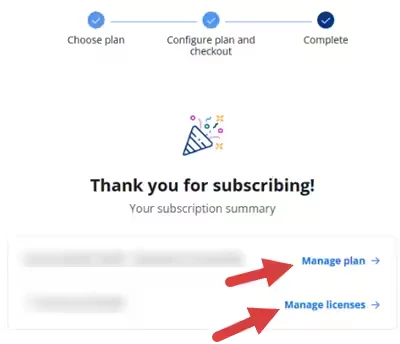
- A subscription summary displays to indicate that your subscription plan has processed.
- Click the Manage Plan link to return to the subscription page.
- Click the Manage Licenses link to assign licenses to users.
Manage Licenses
Assign licenses to users to set staff permissions and allow staff to use features in your plan that that require a license to access. The licenses available under the Manage License tab are determined by your subscription plan and any additional Addon licenses you purchased when you subscribed to your plan.
NOTE: You must Add a Staff Member to your clinic before you can assign licenses to that user.
When you manage licenses for your clinic, you will only see licenses that are available on your subscription plan. If you need access to additional licenses, you may need to Edit or Change your Subscription Plan.
- Provider License: Includes Therapist, Admin and Org Admin permissions.
- Admin License: Includes Admin and Org Admin permissions.
- Telehealth License: Access to Telehealth
- Wiley License: Access to Wiley Practice Planner
- Client Portal License: Access to Client Portal
- Ensora eRx License: Access to ePrescribe with Ensora eRx
NOTE: Users who need to access Teleheath, Wiley, or Ensora eRx are required to have a Provider license.
When you assign a Provider or Admin license to a user, Staff Permissions are automatically updated for that user. You can not assign a staff permission to a user who has not been assigned a license that is associated with that permission. If a user is not assigned an Admin or Provider license, the user can be given Default Permissions and Billing Permissions.
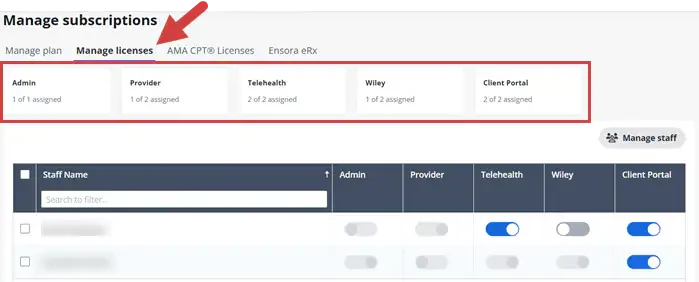
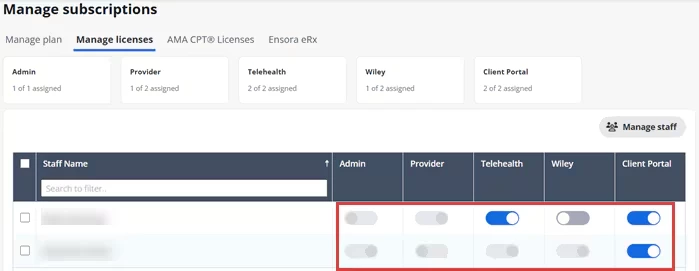
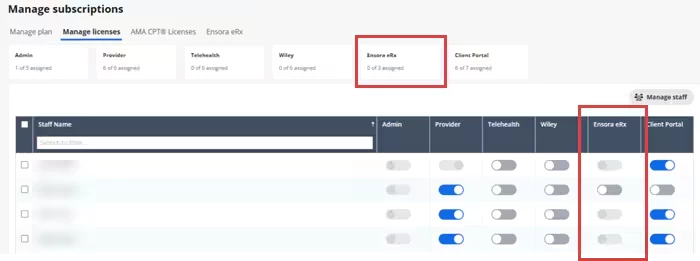
Your clinic licenses display at the top of the Manage Licenses tab. Each license will indicate how many are available for the clinic, and how many of those have been assigned. Use the toggle buttons next to each staff member to assign or unassign a license. If all available licenses have been assigned, the toggle button will be disabled and you will not be able to assign the license to additional users. If you need to add licenses to your plan, you can Edit your Subscription Plan.
- Click Organization tab in primary navigation bar.
- Click Manage Subscription in side navigation.
- Click the Manage Licenses tab.
- Review which licenses are available and how many of each license have been assigned.
- Click the Toggle Buttons in the License columns to assign a license to a user.
- Review which licenses are available and how many of each license have been assigned.
Edit Your Subscription Plan
If you need to change the number of therapists or licenses on your plan, you can edit your plan. You can also Change your Subscription Plan if you decide that another plan level would be a better fit for your clinic.
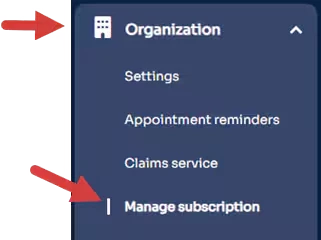
- Click Organization tab in primary navigation bar.
- Click Manage Subscription in side navigation.
- Click the Manage Plan tab.
- Click your Ensora Mental Health Plan.
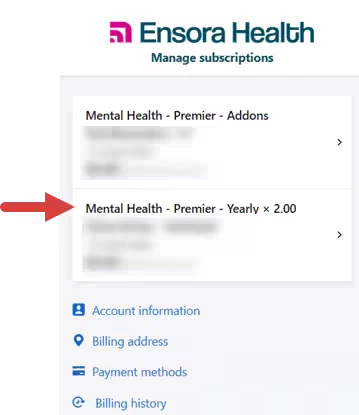
- Click Edit Subscription.
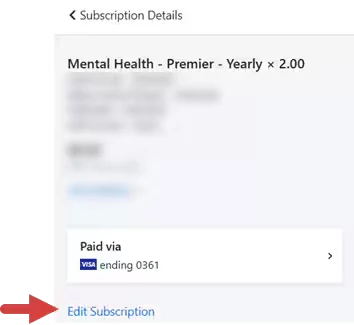
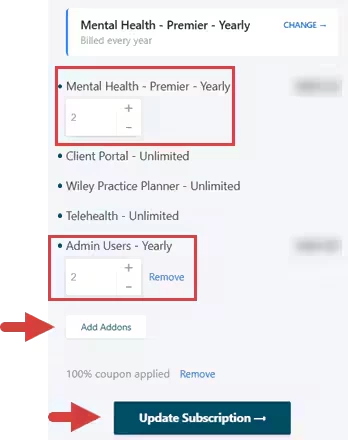
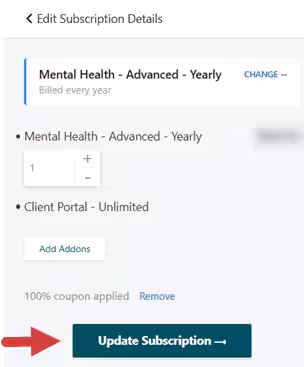
- Edit Subscription Details:
- Click the Plus/Minus buttons under the subscription plan name to add or remove Therapists (Provider Licenses) on your plan.
- Click the Plus/Minus buttons under a license to add or remove licenses, or click Remove to remove all licenses of that type.
NOTE: If your plan offers unlimited licenses, these licenses will automatically be available for all Therapists.
- Click the Add Addons button to add additional licenses to your plan.
- Click the Update Subscription button.
Change your Subscription Plan or Switch to Annual Billing
Change Your Subscription plan if you decide that another plan level would be a better fit for your clinic. You can also switch to from monthly to annual billing.
- Click Organization tab in primary navigation bar.
- Click Manage Subscription in side navigation.
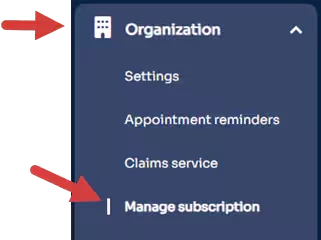
- Click the Manage Plan tab.
- Click your Ensora Mental Health Plan.
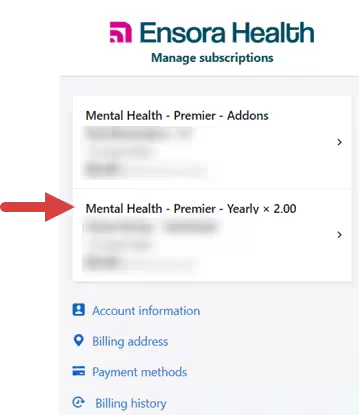
- Click Edit Subscription.
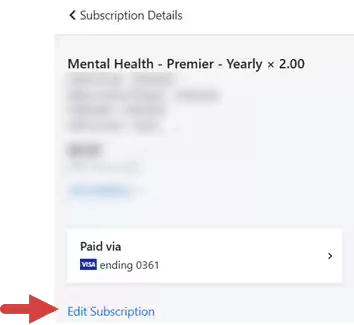
- Click Change.
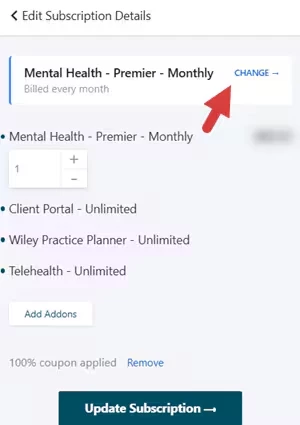
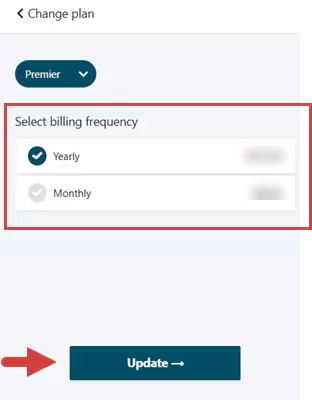
- Select Plan Changes.
- Click the Plan Drop-down at the top to select a different plan.
- Click the Yearly or Monthly buttons to select billing frequency.
- Click Update.
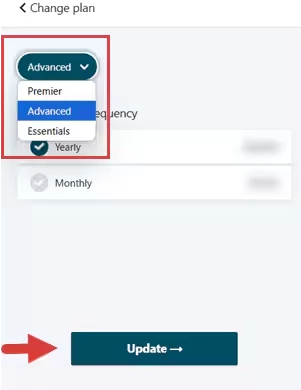
- Click Update Subscription.
Subscribe Staff and Prescribers to ePrescribe with Ensora eRx
You must subscribe/add a Provider to the system AND complete the Provider registration with Ensroa eRx. Doing so will initiate the Identity Proofing Process.
Before your Providers can Register for Ensroa eRx you need to add them to Ensroa eRx. As soon as you subscribe a Provider, they will receive an alert in the system with a link to complete registration with Ensroa eRx. They will need to enter prescriber information, upload documents and verify their identity.
You can also set up users with an Admin or Nurse role. These users need to register with Ensroa eRx but do not need complete Identity Proofing.
Get Started
- Click Organization tab in primary navigation bar.
- Click Manage Subscription in side navigation.
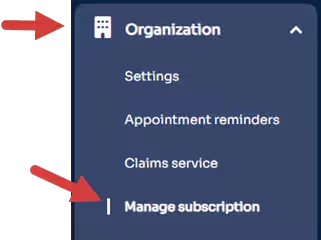
- Click the Ensora eRx tab.
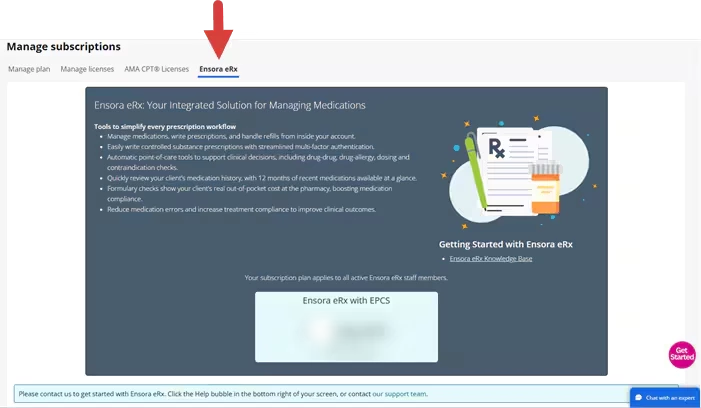
- Select an option to contact support about getting started with Ensroa eRx.
- Click the Chat tab to chat with support.
- Click the Our Support Team link for more ways to contact support.

Add Ensora eRx Licenses
Add Ensora eRx licenses to each provider who will be ePrescribing. After a user has been assigned an Ensora eRx license, the provider can register with Ensora eRx.
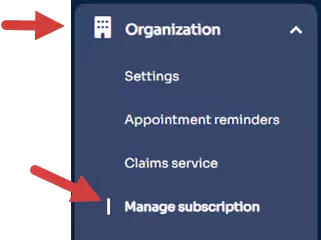
- Click Organization tab in primary navigation bar.
- Click Manage Subscription in side navigation.
Click the Manage Licenses tab and assign Ensora eRx licenses.
Register Providers with Ensora eRx
- Click Organization tab in primary navigation bar.
- Click Manage Subscription in side navigation.
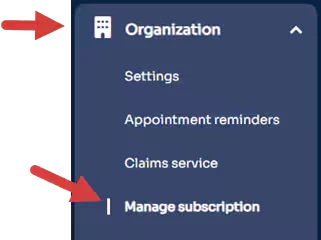
- Click the Ensora eRx tab.
- Click the Choose Provider field and select the name of the staff or provider.

- Confirm or enter missing information.
NOTE: Select Nurse or Admin ePrescribing role for users who need access to eRx but don't need to do Identity Proofing.
- Default Location & Address pulls in from the Location listed on the Provider Profile.
- Organization Name & Address pulls in from the Organization tab.
- Fax Numbers are required fields.
- Confirm Provider NPI and DEA Number.
- Enter in additional License Number and License State.
- Click Submit. The Provider will receive an alert
in the system with a link to complete the registration.
Pause Subscription
You can pause your account twice per the life of the account for up to three months each time. Pausing is not the same as Cancelling your Subscription. During this time:
- Organization Administrators will only be able to access the Organization > Manage Subscription page. You will not be able to access your Client Data.
- Non-Organization Administration Staff will not be able to log in at all.
If you decide to pause your Subscription all of your data will be preserved until you resume your subscription. You will not be charged while your account is paused. The Account will automatically be reactivated at the end of the chosen suspended period.
NOTE: When you pause your subscription, it goes into effect on the date your subscription is due to renew. If you have already suspended your account twice, you no longer have the option to pause your subscription.
- Click Organization tab in primary navigation bar.
- Click Manage Subscription in side navigation.
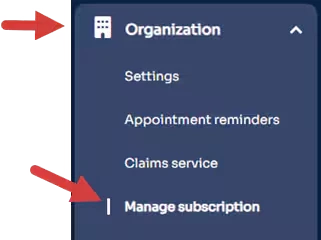
- Click your Ensora Mental Health Plan.
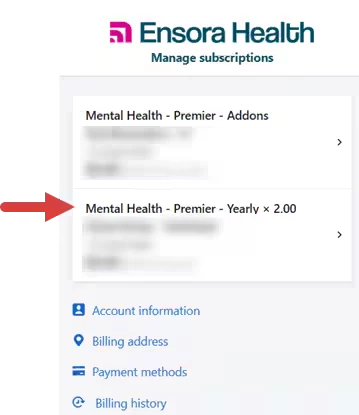
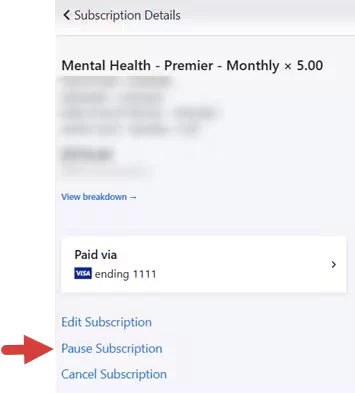
- Click Pause Subscription.
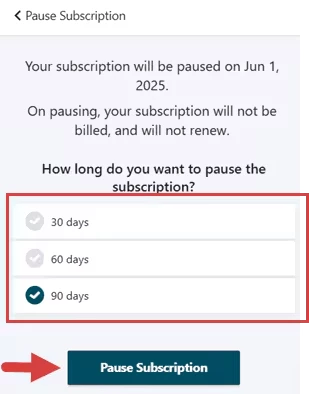
- Select the number of Days you are pausing your subscription for.
- Click Pause Subscription.
Cancel Subscription
Thinking of canceling your Subscription? We're sorry to see you on this page - we truly value you as a customer. Before you cancel, here are a few important things to consider:
Need a break instead?
Pause your Subscription: Temporarily pause your account without losing your data.
Before Canceling:
You may want to export your client data for your records.
IMPORTANT: Once your subscription is canceled, you will no longer be able to access your account or any data associated with it.
Contact Support
If you need help with anything or are still deciding, our Customer Care team is happy to explore options and solutions with you - feel free to reach out before canceling! Whether it's billing questions, account changes, exporting data, or anything else inside the system - our Customer Care team is ready to support you.
Live Chat:
Chat with a Customer Care Specialist inside your account.
Email:
MentalHealth.Support@ensorahealth.com
Phone:
1-800-867-7405
Cancel Your Subscription
There is no fee to cancel your subscription before your renewal date.
NOTE: Canceling a few days before the end of your billing period will help you maximize your remaining time.
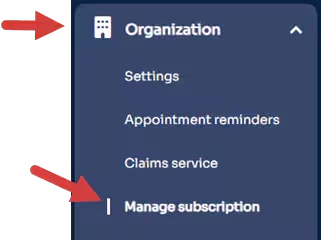
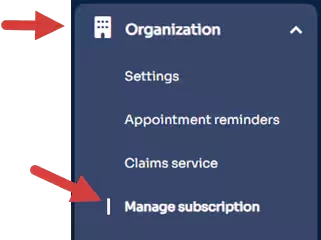
- Click Organization tab in primary navigation bar.
- Click Manage Subscription in side navigation.
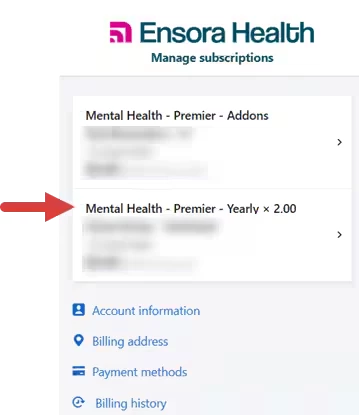
- Click your Ensora Mental Health Plan.
- Click Cancel Subscription.
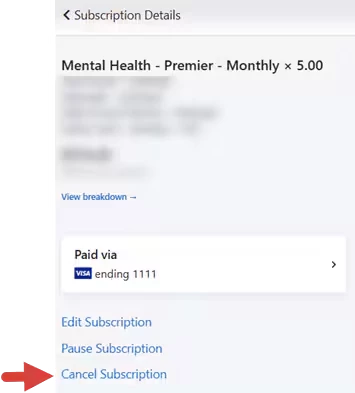
- Review Cancellation information and answer required cancellation questions, then click Cancel My Account.

Add or Update Payment Information
You can pay for your subscription via your bank account or a credit/debit card. ACH Payments are currently only available for US customers.
If you have multiple payment methods on file, you can indicate which one is the Primary payment method. This will be used as the default payment method for your subscription. You can change the primary payment method or add a new payment method at any time.
NOTE: We do not store or log any financial or card details anywhere on our system. The details collected to make any payment are taken in a secure manner and passed directly to our secure billing platform.
- Click the Organization tab in primary navigation bar.
- Click Manage Subscription.
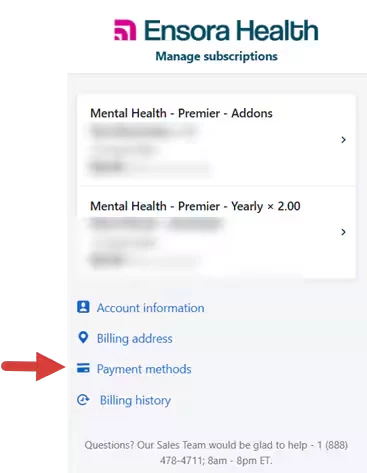
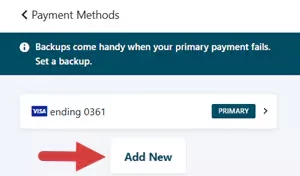
- Click Payment Methods.
- Click Add New.
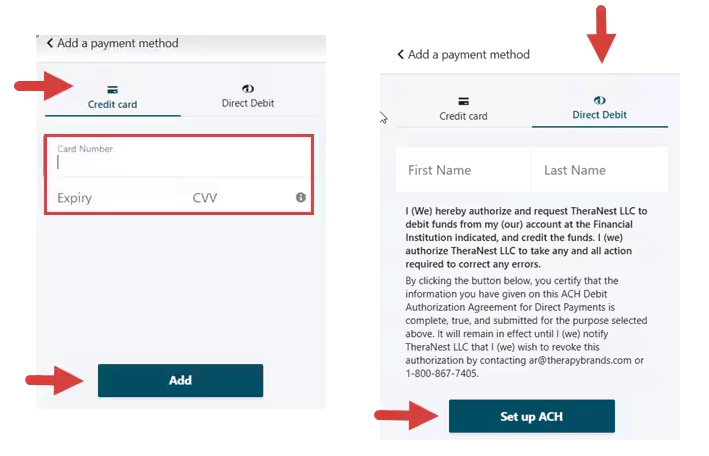
- Click Credit Card to Add a Credit Card, or Click Direct Debit to set up ACH.
- Credit Card: Enter Card Number, Expiration Date and CVV, then click the Add button.
- Direct Debit: Enter First Name and Last Name, Click the Set up ACH button, then follow the prompts to connect your accounts. You will be connected to a secure billing platform where you can enter your banking information.
NOTE: Adding ACH information may take up to 15 days to process. When adding a checking account, a micro-deposit will be made to verify your account.
View or Download Invoice Receipts
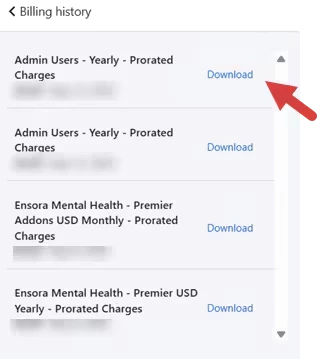
You can view and download Invoices in the Manage Subscription section using the the Billing History Link. You can also download a pdf copy of each invoice. To change the email address where invoices are sent, send a written request for the change. The request must come from the subscription owner.
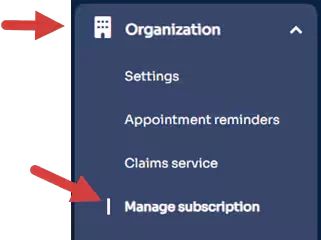
- Click Organization tab in primary navigation bar.
- Click Manage Subscription.
- Click Billing History.
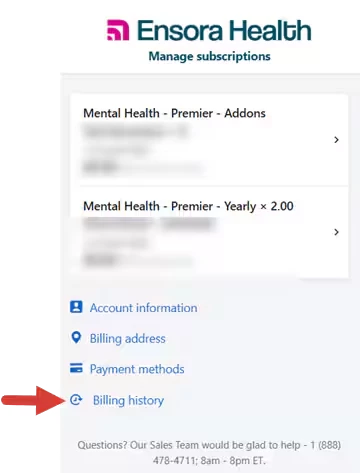
- Invoices are listed by date.
- Click the Scroll Bar to locate an older invoice.
- Click Download to download a a pdf copy of the full invoice.
