


NOTE: This article outlines the planned workflow for Ensai Session Assistant. For the current workflow, see Ensai Session Assistant: Generate Notes
PERMISSIONS REQUIRED: An administrator must enable Ensai Session Assistant for individual users.
Ensai Session Assistant converts recorded sessions and dictated notes into structured clinical documentation in Fusion. This article provides an overview of the workflow used to generate notes using this tool.
Ensai Session Assistant is available through Fusion on computers, tablets, and phones, and the steps below are the same on every device. The browser extension is not required and will be retired in the near future.
Jump to Section:
Create an Appointment
- Navigate to Schedule.
- Add an appointment for your patient.
- This appointment will be available to select when you create the encounter in Ensai Session Assistant.
Select an Appointment
- Open Ensai Session Assistant from the My Profile menu in Fusion. Select Launch Ensai Session Assistant.
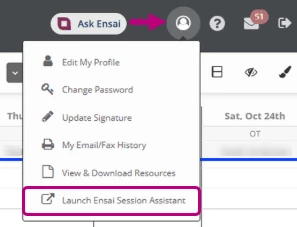
- Select the applicable Fusion appointment(s) from the appointment list.
- Toggle between the Single-patient and Multi-patient appointment views to select one patient for a single-patient session or multiple patients for a multi-patient session.
- Review the note type selected for the appointment:
- For an Initial Evaluation appointment, Ensai Session Assistant will generate an Initial Evaluation and Daily Note by default.
- For Normal Visit appointments, Ensai Session Assistant will generate a Daily Note by default.
- Select a different note type, if needed.
NOTE: Ensai Session Assistant uses the selected Fusion appointment to determine the note type and link the generated documentation to the corresponding patient and appointment.
Capture Session Context
- Capture as many of the following context types as needed for the session:
- Ambient recording
- Dictation
- Typed Notes
- Upload context
- For Ambient recording or dictation:
- Review the patient information provided on the consent screen. Check the box to confirm consent and select YES to continue. Recording will begin once YES is selected.
- To temporarily stop the recording, click Pause.
- To type alongside the recording, open the Notepad.
- Once all context has been captured for the session, click End & Save.
- Click Review summary, or you can click Save draft to save and return to it later.
Review & Edit the Clinical Summary
- Review the generated Clinical Summary, and edit any fields as needed (subjective, objective, tests & measures, goals, etc.).
- Delete any sections you do not want to send to Fusion.
- If you need to add more context, click Back to draft to return to the context screen.
Send the Note to Fusion
- From the clinical summary screen, click Submit to EMR.
- You can continue working in Ensai Session Assistant or Fusion while the documentation is inserted into the note associated with the selected appointment.
- Return to the applicable appointment in Fusion.
- Open the populated note.
IMPORTANT: You do not need to keep the note open while the documentation is inserted. If Fusion cannot insert the documentation because it conflicts with an existing completed document, an explanation will display instead of overwriting the document.
NOTE: Notes generated by Ensai Session Assistant are clearly labeled and timestamped. This label stays visible after you sign the note for your records, but it does not appear on the printed version of the note.
Complete the Note
- Navigate to the relevant patient documentation in Fusion to review the populated notes.
- Review and edit the generated notes.
- Enter any required goal progress and charges.
- Confirm that all required fields are complete.
- Save and sign the note.