

PERMISSIONS REQUIRED: Users with the Docs permission are able to create daily notes and other documents.
When you Check In a patient, Fusion will automatically create a Daily Note for that appointment. If you are checking in an Evaluation appointment, an Evaluation will also automatically populate. If your clinic uses Fusion's billing, daily notes are how you submit your charges.
Use the daily note to document appointment information, subjective observations, treatment objectives, assessment, treatment plan and charges. If you are billing, you must complete the charges section of the daily note. Any section that you do not use can be left blank and will not display on the final document.
NOTE: Many special characters, such as ð or ñ, can be saved in the goal bank, goals, daily notes, and evaluations when they are pasted in or inserted with an alt-code.
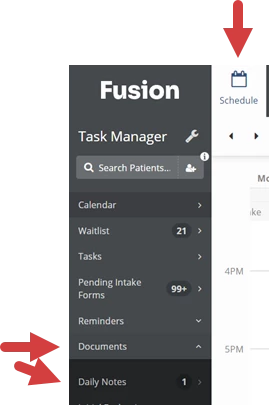
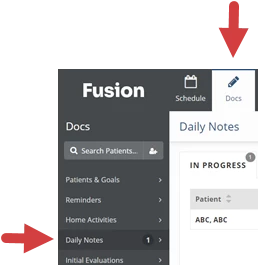
You can access Daily Notes from the Schedule tab or Docs tab.
- From the Schedule tab, click Documents from the menu on the left, then select Daily Notes. This will direct you to the Daily Note section on the Docs tab.
- From the Docs tab, select Daily Notes from the menu on the left.
| 
|
Jump to Section:
Navigate in Daily Notes
Daily Notes are organized by tabs at the top of the page. Click a tab to access notes on that tab, then click the a daily note to view or work in that note.
- In Progress: Daily Notes that need your attention. Includes daily notes on the Not Started, Draft, and Sign Off tabs.
- Not Started: Daily Notes for checked-in patients that have not been started.
- Drafts: Daily Notes that have documentation but are not signed.
- Sign Off: Daily Notes other therapists have sent to you for documentation or cosign.
- Pending: Daily Notes you have sent to other therapists for documentation or cosign.
- Completed: Daily Notes that have been completed and signed.

Working in a Daily Note
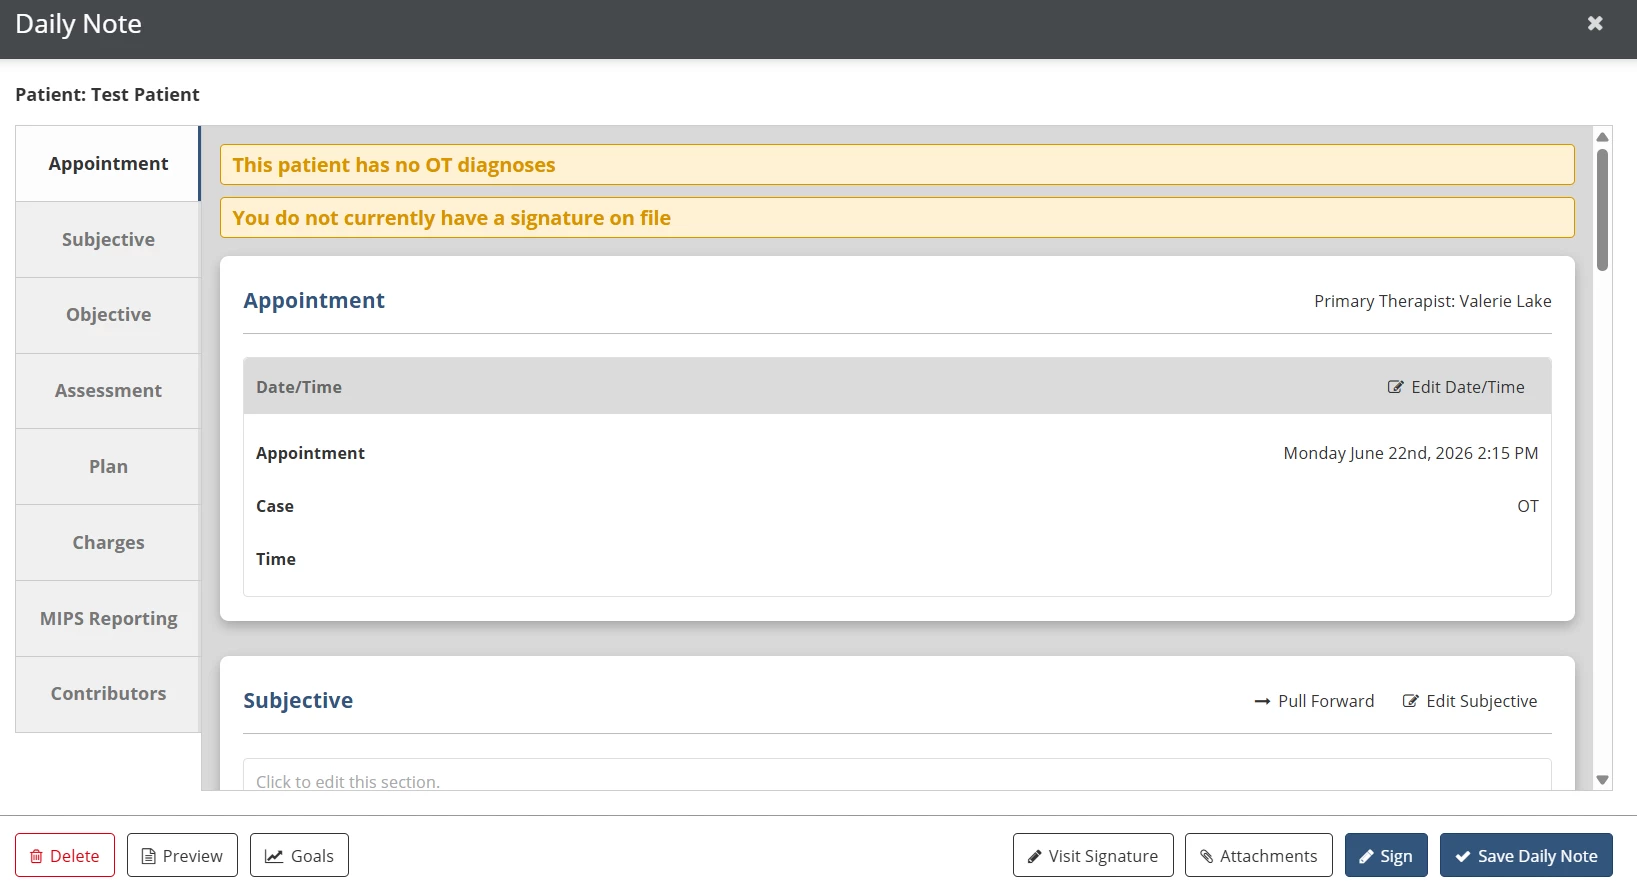
The Daily Note is organized by the Appointment, Subjective, Objective, Assessment, Plan, Charges, MIPS Reporting, and Contributors tabs on the left side of the note. Click any tab to jump to that part of the note, or use the scroll bar on the right to navigate through the note. Use the buttons at the bottom of the daily note to perform additional functions, and sign the note when your documentation is complete.
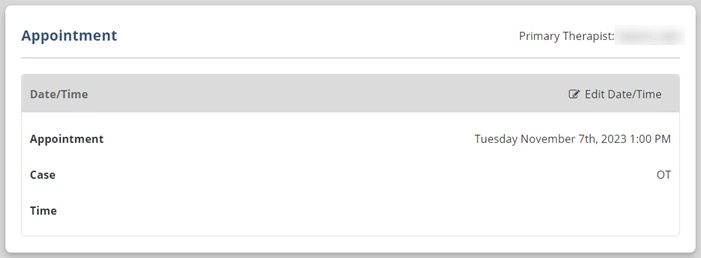
NOTE: The Appointment section will indicate what patient case the document is associated with. You cannot change a document that has been started to a different case or to an appointment for a different case.
- Click the Delete button to delete the note.
- Click the Preview button to preview, download or print the note.
- Click the Goals button to view patient goals.
- Click the Visit Signature button to add a visit signature.
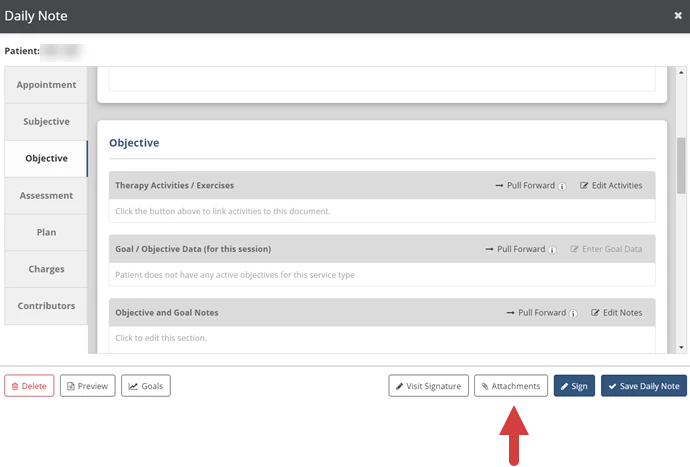
- Click the Attachments button to add attachments to the note.
- Click the Sign button to sign and submit the daily note.
- Click the Save Daily Note button to save your documentation and finish the note later.
Click the Edit button in the upper right corner of each section (or click anywhere inside of the section) to edit that section, then when you're finished, click the Save button in the upper right corner. The section will also save automatically if you click in a different section on the document.
NOTE: You can use Quick Phrases to inset commonly used text into your daily note. Quick Phrases are set up by your clinic and can be pulled in by typing a period followed by the Quick Phrase.
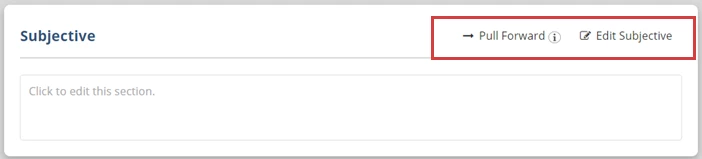
Click the Pull Forward button to copy information from a previous document into the current note.
- Information pulls from the most recent daily note, by date of service, where that section was used.
- Information pulls from signed documents for the same patient case.
- Make sure any information you pull forward is updated to reflect the current treatment session before you sign the note.
Add an Attachment to a Daily Note
- Click the Attachments button.
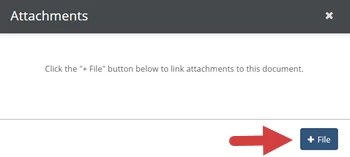
- Click the +File button.
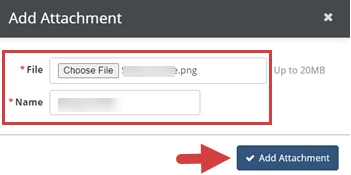
- Click Choose File to select a file to upload.
- Click in the Name field to rename the attachment. (The name of the file automatically populates in the Name field.)
- Click the Add Attachment button.
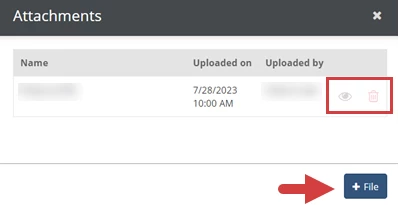
- The attachment displays with name and upload details.
- Click the Preview
Icon to preview the attachment.
- Click the Delete
icon to delete the attachment.
- Click the +File button to add another attachment.
- Click the Preview
Appointment
Fill in the basic information about the appointment that is associated with the daily note.
- In the Appointment field, you can select or change the appointment the document is linked to.
- In the Time field, you can fill in the time the session actually began and ended. If you've already filled this in on an evaluation, progress note, or re-assessment linked to the same appointment, you can click the copy icon
to bring over that information.
- The Case field indicates what patient case the document is associated with. You cannot change a document that has been started to a different case or to an appointment for a different case.
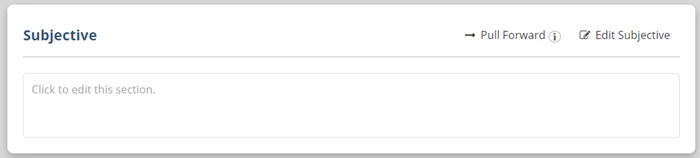
Subjective
Type in subjective information about the patient. This might include patient, caregiver, or other professional reports about limitations, concerns, problems, or progress related to the patient's therapy.
Objective
The Objective tab has three documentation sections: Therapy Activities/Exercises, Goal/Objective Data, and Objective and Goal Notes. The Pull Forward buttons will only pull forward content from previous documents for the same case.
Therapy Activities/Exercises
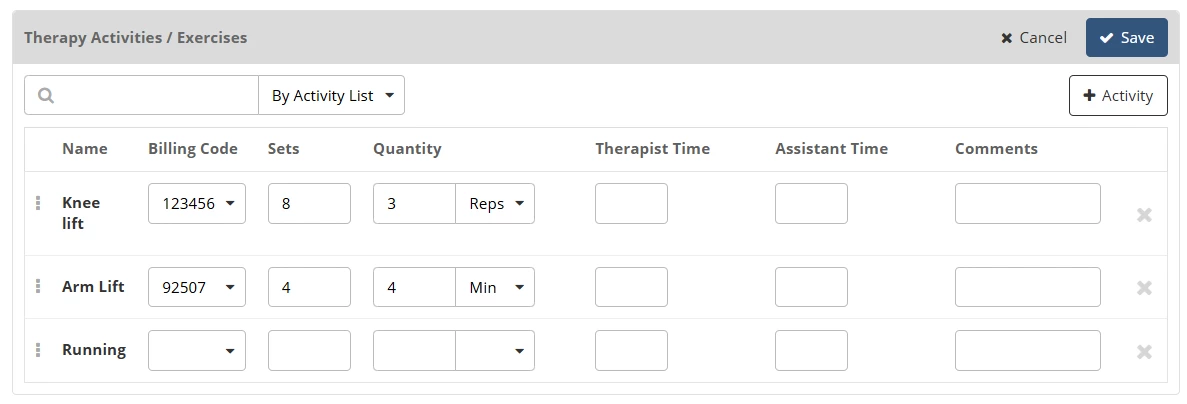
Use the Therapy Activities/Exercises section to document activities completed during the session.
- Use the Search field to select an activity or list of activities.
- Use the drop down next to the search field to search by Activity or Activity List.
- Search by Activity to add an individual activity.
- Search by Activity List to pull in a predefined set of activities configured by a clinic administrator.
- If you can’t find the activity you need using the search, click the +Activity button to add it to the system. Then, search for the newly added activity to add it to the note.
- You have the option to document the following information about each activity:
NOTE: Activity lists may pull in billing codes and default sets and reps that have been set by an administrator. Each activity, along with any associated default values or billing codes, can be edited or removed as needed.
Billing codes configured on activity lists will also pull into the Charges section unless the activity is removed.
- Billing Code: The billing code for the activity to be used when submitting charges.
- Sets: Number of sets for the activity.
- Quantity: The Quantity per set (Reps, Minutes or Seconds).
- Therapist Time: Therapist time for the activity.
- Assistant Time: Assistant time for the activity.
NOTE: For billing, Assistant Time is calculated against the total activity time. If the Assistant provides more than 10% of the total time, the system automatically applies the appropriate CO/CQ modifiers when charges are submitted.
- Comments: Comments from the therapist about the activity.
TIP! Before you open the activities section for editing, click Activity Progress for a consolidated view of activity history across visits. This allows you to review how documented activities have changed over time without having to leave your note.
- Click Activity Progress to view a record of the patient’s documented activities.
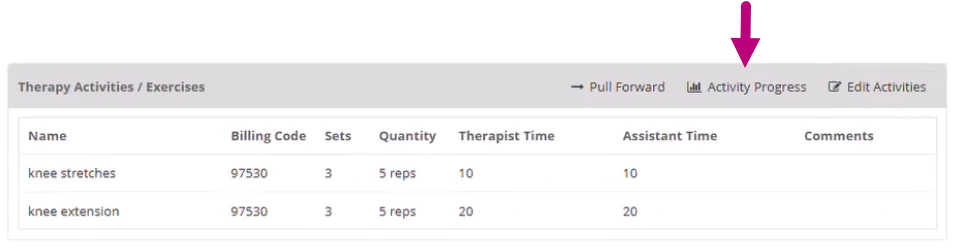
- Click Print Activity Progress to print a PDF version.

Goal/Objective Data
Use the Goal/Objective Data section to record data and comments patient goals you worked on during the appointment. This section will only display the goals and objectives for the patient case associated with the document/appointment.
Goal data is also stored separately from the daily note and can be accessed from the Goals button in the patient chart.

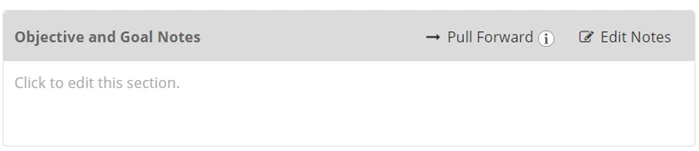
Objective and Goal Notes
Use the Objective and Goal Notes section to document any other objective information about the patient, such as additional notes about their goals.
Assessment
Use the Assessment section to document your assessment of the patient's performance during the session and how the patient is progressing in their treatment.

Plan
The Plan tab has three documentation sections: Plan of Treatment, Take-Home Activities, and Assigned Home Activities. The Pull Forward buttons will only pull forward content from previous documents for the same case.
Use the Plan of Treatment section to document your plan for the patient's future treatment sessions.

Use the Take-Home Activities section to document activities the patient should complete at home.

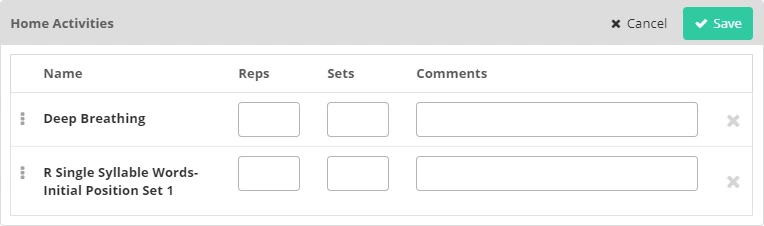
Use the Assigned Home Activities section to link home activities you have assigned to the patient to the daily note. You can also record sets, reps, and other notes about the activity here.
NOTE: Your clinic needs the Home Education Platform add-on to use Home Activities. Please contact support for more information.
Charges
Use the Charges tab to select the billing codes that will bill for this session. The codes from the patient's last daily note for the same service type will automatically be selected by default.
NOTE: When billing codes are configured on an activity list that has been added to the Objective section, those codes also pull into the Charges section. These codes can not be removed from Charges unless the associated activity is deleted.
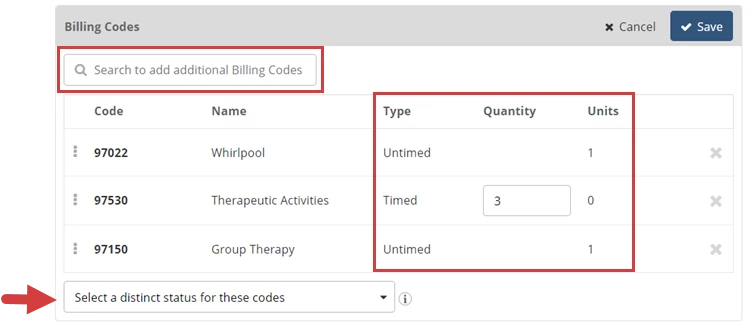
- Click in the Search to Add Additional Billing Codes box to search for and select the codes that will be used to bill for this appointment.
- Fill in the Quantity for any timed or equipment codes.
- For Timed codes, fill in the number of billable minutes that apply to this code.
- For Equipment codes, fill in the number of billable units that apply to this code.
- Untimed codes are always one unit.
- If multiple codes are selected, use the Select a Distinct Status for these Codes drop-down to indicate if the claim is eligible for Modifier 59 consideration. This will appear on the document and helps determine if modifier 59 will be added to the claim. Only select Yes for a procedure or service that was distinct or independent from other non-Evaluation/Management services performed on the same day. Do not select Yes for any Evaluation/Management services.
- If Applicable - Select the Supervisor dropdown at the bottom to choose whose NPI will be used on the claim for this service. The option to Bill an Assistant as a Supervisor appears when the treating therapist does not have the signoff permission and the clinic has enabled them to bill as another user.
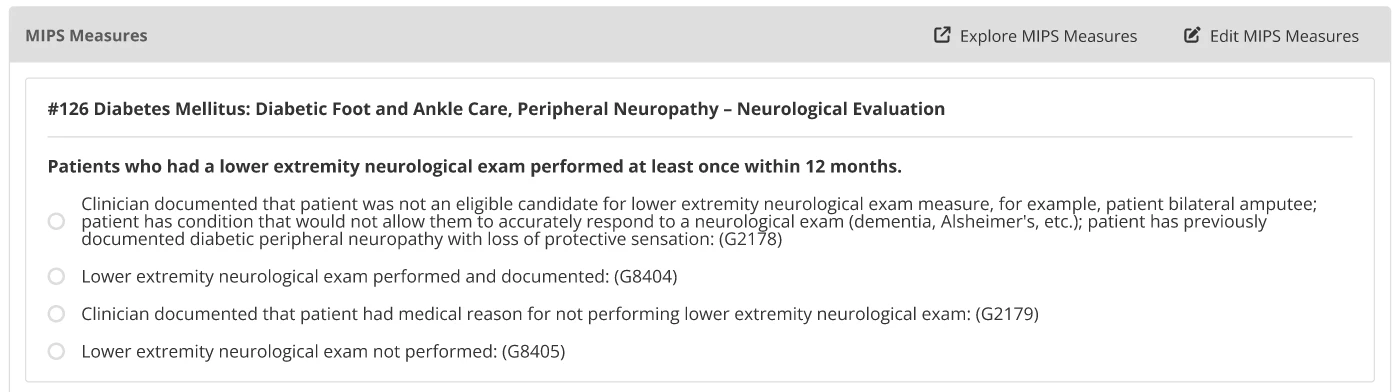
MIPS Reporting
The MIPS Reporting section displays MIPS measures that apply to the patient and have been selected for tracking by the clinic or clinician. You will be able to document a response for each measure that pulls into this section. These measures and responses are used in MIPS reporting.
Tip!: Click Explore MIPS Measures at the top of the section to learn more about the available measures and activities for each performance category.
Contributors
Click the Send to Contributor button on the Contributors tab to to have another therapist edit or add to the daily note before you sign it.

Sign & Submit a Daily Note
Click the Sign button in the lower right to add your signature and submit the daily note. This completes the note and submits any billing codes from the charges section. Depending on your role, you may be asked to select a co-signer. If the daily note is a revision, you will be asked to provide a revision reason. When you have completed the required information, click the Sign Daily Note button.
| Document Name: If needed, choose an alternate document name that will appear on the final document and in the list of completed documents. Co-Signer: If the primary therapist doesn't have the Signoff permission, you can send the document to a co-signer. This may be required depending on clinic options and the payer's settings. Revision Reason: Explain why the document had to be revised and what changed. A log of revision reasons is kept so it can be provided to payers if needed. This only appears if the document has been revised and the clinic's Document Revision History is set to Detailed. Sign Date: The date this document was originally signed. Password: Type in your password. | 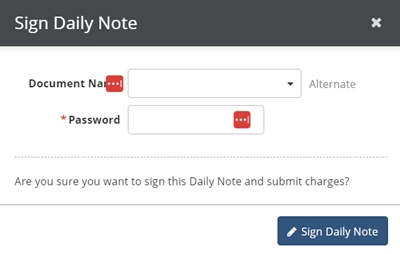
|