

In Configuration - Staff/Users, the Permissions menu option provides a central location for system administrators to control user access to specific application features and categories by User Group. Changes to Permissions require a few moments to take effect but do not require that the user log out and back into the application unless access to the changes is needed immediately.
Features
The Features Permissions category allows users to control a User Group access to some of the functionality or features within a screen without having to restrict full-screen access.
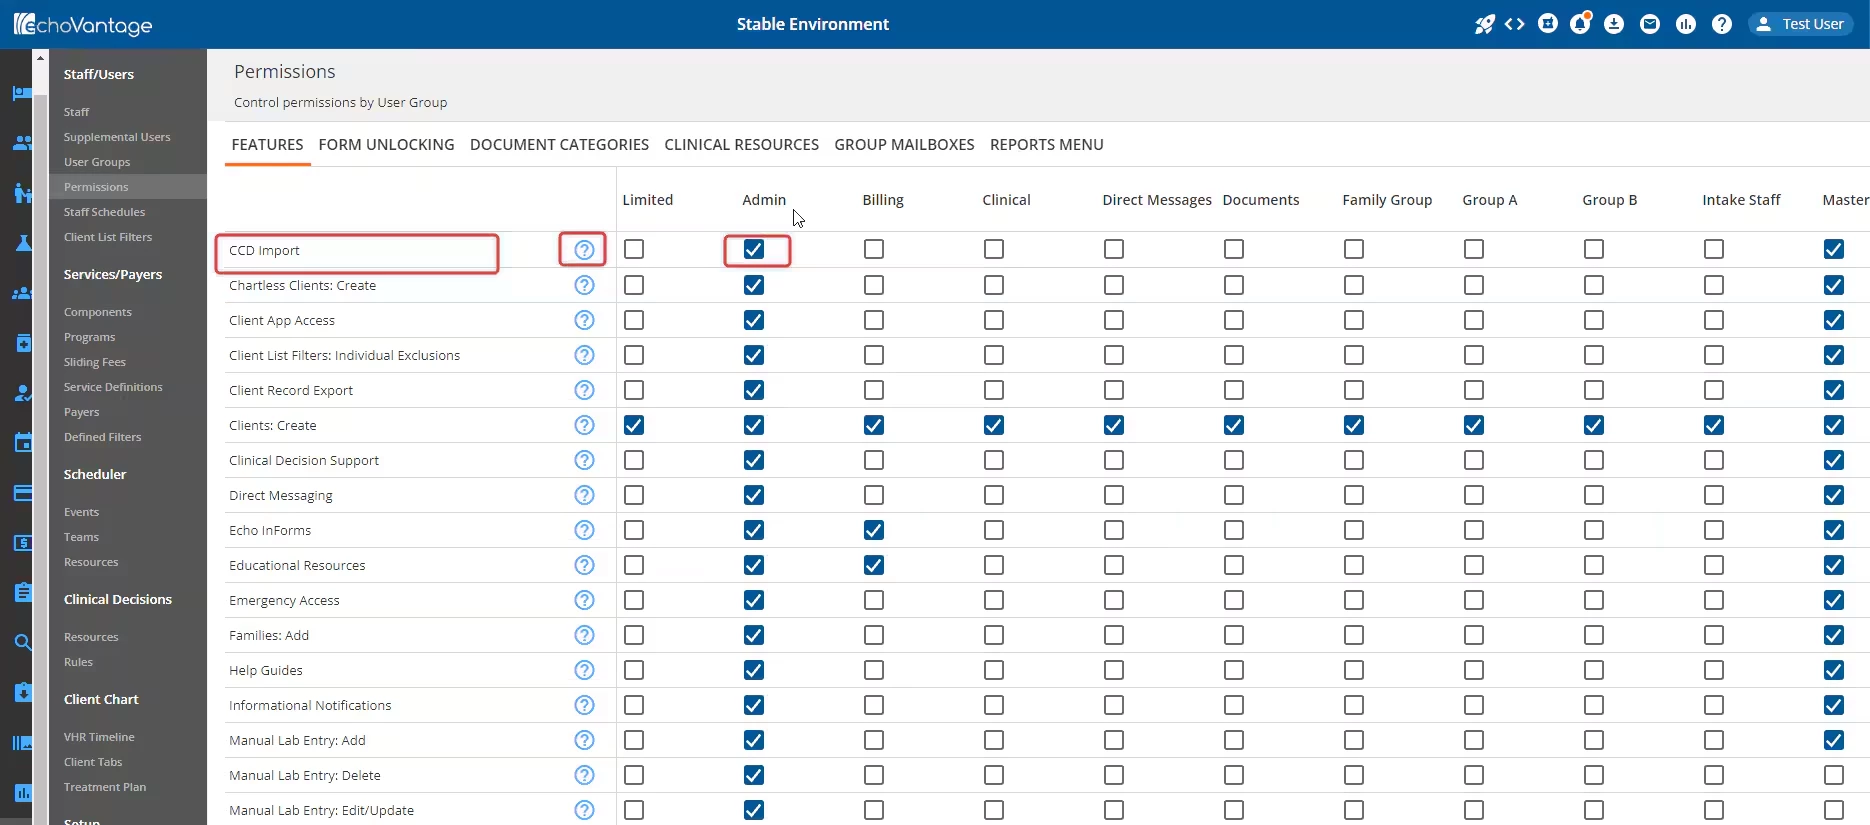
The left column lists the permissible features. Click the blue circle information button to view a brief description of what each feature affects. User Groups as defined in Configuration - Staff/Users > User Groups are listed in the Column labels. There are checkboxes in each User Group column for each feature. Checkboxes for each row and column are available to select (add permission) or deselect (remove permission) for each feature.
To add a permission:
- Find the desired permission from the left column.
- Click the blank checkbox within the column of the desired User Group.
-
IMPORTANT: Once the checkbox is enabled, click the blue Save button to apply these changes.
Form Unlocking
Administrators are able to grant or remove the ability to unlock a form that has signatures within the Form Unlocking tab. Permissions are granted either by All Forms or by individual form selections.

The left column lists the permissible forms. User Groups as defined in Configuration - Staff/Users > User Groups are listed in the Column labels. There are checkboxes in each User Group column for each form. Checkboxes for each row and column are available to select (add permission) or deselect (remove permission) for each form.
To add a permission:
- Find the desired permission from the left column.
- Click the blank checkbox within the column of the desired User Group.
-
IMPORTANT: Once the checkbox is enabled, click the blue Save button to apply these changes.
-
NOTE: Similar to Document Categories, Form Unlocking has an All Forms checkbox at the top of each User Group column.
- Click the topmost blank checkbox to grant access to all forms for that User Group.
- Individual Forms may be deselected after the All Forms checkbox is marked. The checkbox will change to a hyphen symbol if any form is deselected.
NOTE: Remember to always click the blue Save button to record changes.
Users with form unlocking permissions will see a white padlock Unlock button on the affected form.
Document Categories

NOTE: These permissions do not affect the ability of the user to access the Document Management Portal from Clients > Documents if that tab is available to the User Group.
The left column lists the permissible documents. User Groups as defined in Configuration - Staff/Users > User Groups are listed in the Column labels. There are checkboxes in each User Group column for each document category, as configured in Configuration - Setup > Defined Lists. Checkboxes for each row and column are available to select (add permission) or deselect (remove permission) for each category.
To add a permission:
- Find the desired permission from the left column.
- Click the blank checkbox within the column of the desired User Group.
-
IMPORTANT: Once the checkbox is enabled, click the blue Save button to apply these changes.
-
NOTE: Similar to Form Unlocking, Document Categories has an All Forms checkbox at the top of each User Group column.
- Click the topmost blank checkbox to grant access to all forms for that User Group.
- Individual documents may be deselected after the All Documents checkbox is marked. The checkbox will change to a hyphen symbol if any document is deselected.
- The user can also select the Uncategorized checkbox to grant access to all uncategorized documents.
NOTE: Remember to always click the blue Save button to record changes.
Clinical Resources
Â
The left column lists the permissible resources. User Groups as defined in Configuration - Staff/Users > User Groups are listed in the Column labels. There are checkboxes in each User Group column for each resource, as configured in Configuration - Clinical Decisions > Resources. There are checkboxes in each User Group column for each resource. Checkboxes for each row and column are available to select (add permission) or deselect (remove permission) for each resource.
To add a permission:
- Find the desired permission from the left column.
-
IMPORTANT: Checkboxes are disabled for User Groups that do not have the Clinical Decision Support permission enabled within the Features tab. A message notifying the user of this requirement will appear when a disabled checkbox is hovered on.
- Click the blank checkbox within the column of the desired User Group.
-
IMPORTANT: Once the checkbox is enabled, click the blue Save button to apply these changes.
Group Mailboxes
The left column lists the permissible mailboxes. User Groups as defined in Configuration - Staff/Users > User Groups are listed in the Column labels. There are checkboxes in each User Group column for each document category, as configured in Configuration - Setup > Group Mailboxes. Checkboxes for each row and column are available to select (add permission) or deselect (remove permission) for each mailbox.
NOTE: There are two sets of checkboxes in each User Group column for each mailbox within this specific tab: View and Send.
- Users with the View permission enabled will see this Group Mailbox and related messages in the Messages section of their Inbox.
- Users with the Send permission enabled can send messages, replies, and forms with Review or Signature Requested to the Group Mailbox. When disabled, users are only able to send messages to individual recipients.
To add a permission:
- Find the desired permission from the left column.
- Click the blank checkbox within the column of the desired User Group.
-
IMPORTANT: Once the checkbox is enabled, click the blue Save button to apply these changes.
Reports Menu
NOTE: A user with permission to any form that links to a report allows access even if permission to the report in the Reports folder is not granted.
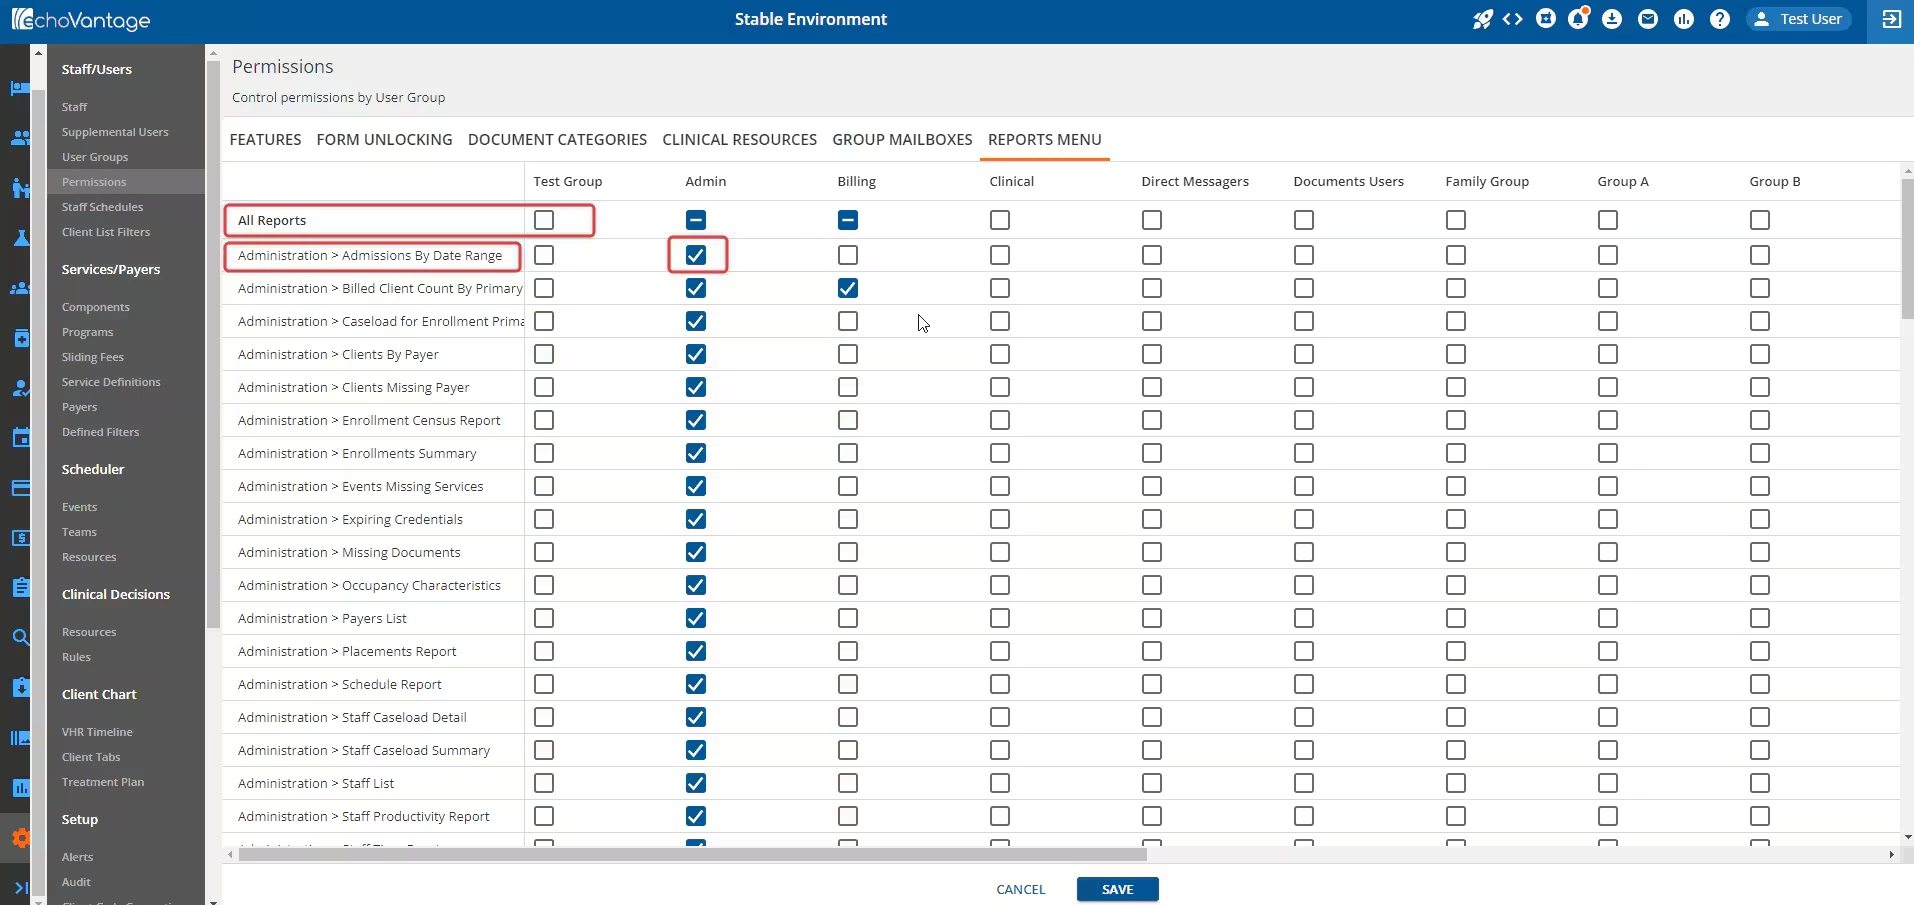
The left column lists the permissible reports. User Groups as defined in Configuration - Staff/Users > User Groups are listed in the Column labels. There are checkboxes in each User Group column for each report. There are checkboxes in each User Group column for each report. Checkboxes for each row and column are available to select (add permission) or deselect (remove permission) for each report.
Reports Menu Permissions control which reports, if any, a User Group member can view within the Reports icon in the application navigation bar.
To add a permission:
- Find the desired permission from the left column.
- Billing, Sub, and Custom reports preceded by an underscore do not display.
- Click the blank checkbox within the column of the desired User Group.
-
IMPORTANT: Once the checkbox is enabled, click the blue Save button to apply these changes.
-
NOTE: Similar to Form Unlocking, Reports Menu has an All Reports checkbox at the top of each User Group column.
- Click the topmost blank checkbox to grant access to all reports for that User Group.
- Individual reports may be deselected after the All Reports checkbox is marked. The checkbox will change to a hyphen symbol if any report is deselected.
NOTE: Remember to always click the blue Save button to record changes.
- Users without permission to view a report do not see the report listed in the applicable folder.
- Users without permission to view any reports within a folder no longer see the folder listed.
- Users without permission to any reports only see a "No reports available" message after selecting the Reports icon.
- Access to tabs within Fiscal Overview allows access to the Billing Reports.